


If you’re running a Shopify store without tracking, it is kind of like driving with the lights off at night. You’re moving into a direction, but do not really know where.
Yes, Shopify does have its own tracking built in. It’s decent, but honestly, it’s pretty limited. You’ll see the basics, sales, traffic, conversions, but not much about why customers are doing what they do.
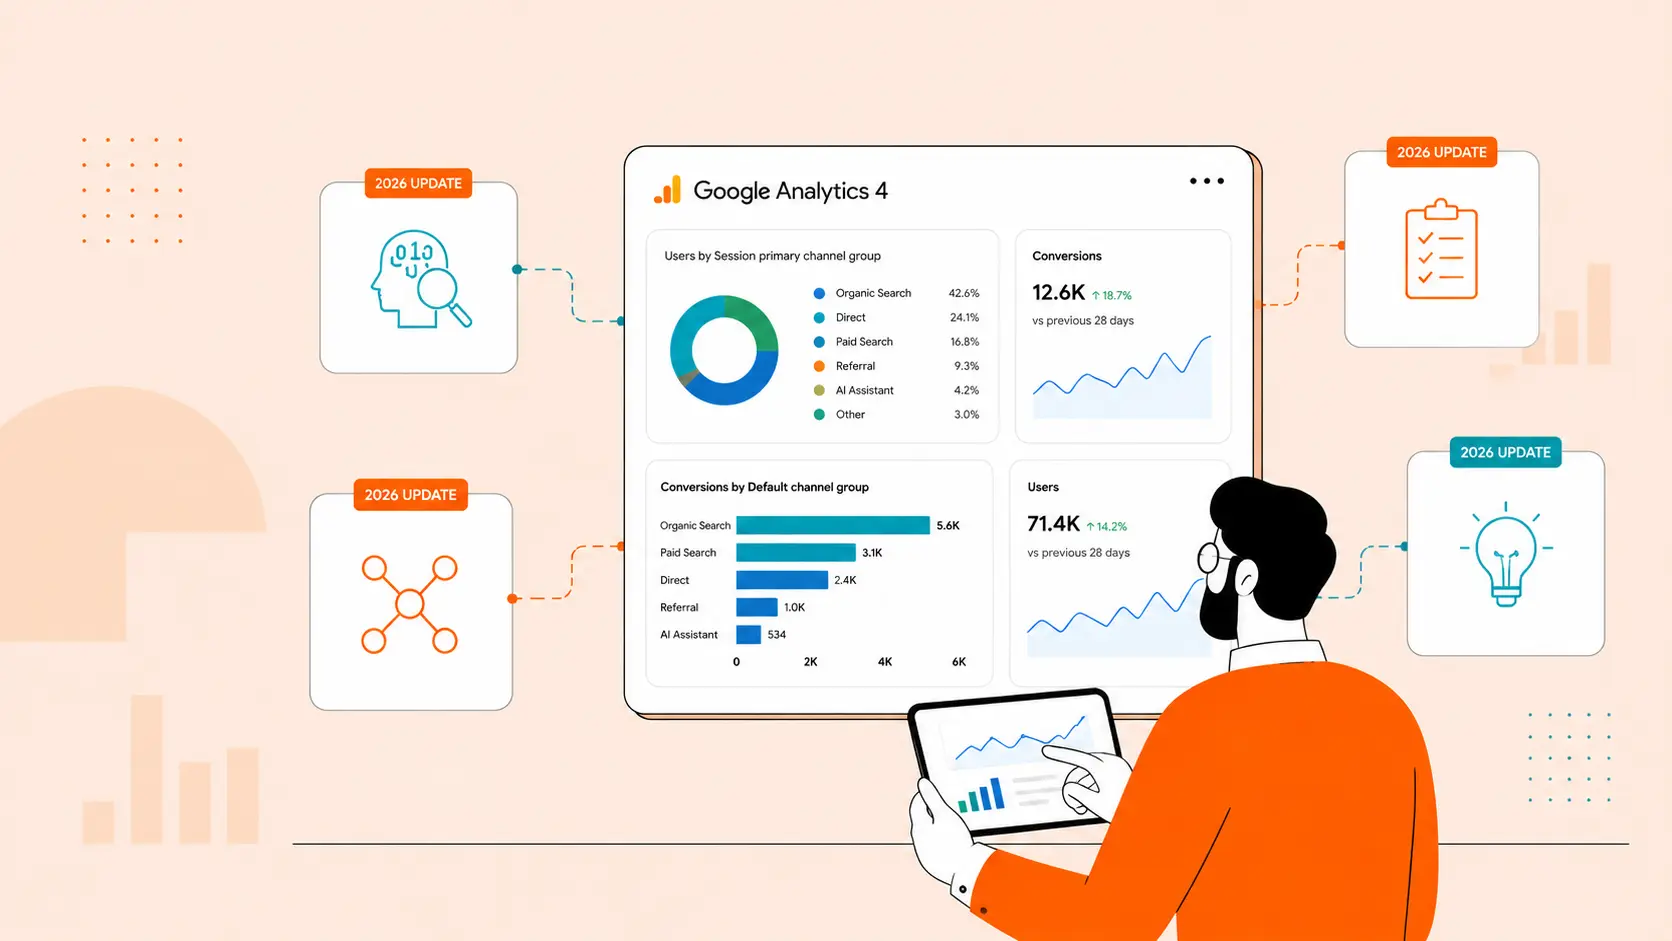
That’s where Google Analytics 4 and Google Tag Manager make a huge and important difference. Integrating these platforms or tools lets you dig deeper, and answer questions like, what made someone add to cart, where shoppers are dropping off, and which campaigns are actually effective. With those insights, you’re not just guessing anymore, with a more granular and accurate data to analyze, this will allow you to make smarter decisions that help your store grow.
Let's dive in...
Preparing Shopify for GA4 and GTM
This step is where we ensure that you’ve set up GA4 and GTM properly, this should help you collect accurate data. If you’re new to this, it might sound too technical, but when you break it down step-by-step, it should be easy to understand and pretty much straightforward.
1) Create a GA4 Property
Head into your Google Analytics account and set up a new GA4 property. This property will serve as the home for all your Shopify data.
Note: We’d recommend creating a separate GA4 Data Stream exclusively for Shopify.
- In Google Analytics, go to Admin → Data Streams → Add Stream → Web.
- Enter your Shopify store URL (e.g., yourstore.myshopify.com or your custom domain).
- Copy the Measurement ID (starts with G-XXXXXXX).

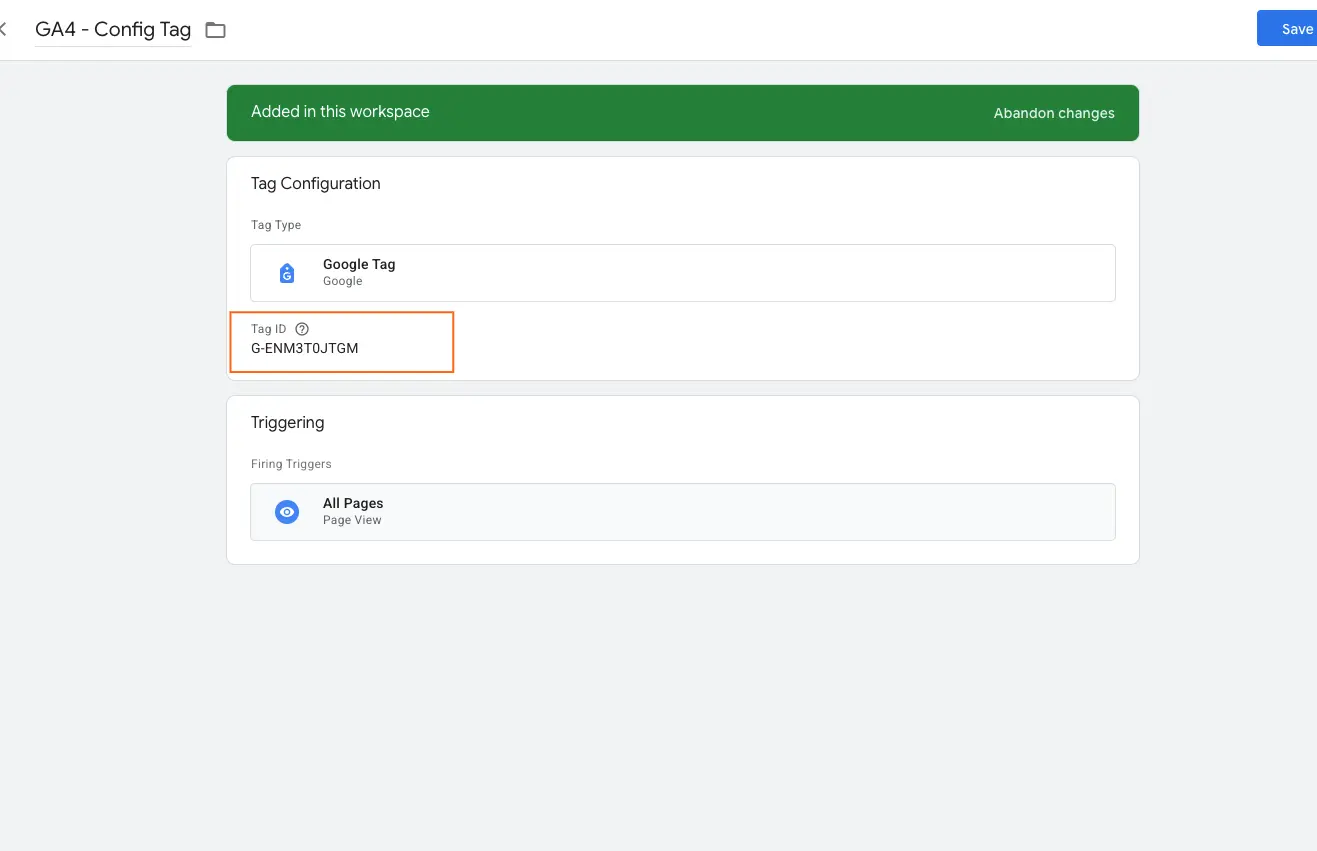
2) Link GA4 with GTM
Once the property is created, connect it with Google Tag Manager. GTM will be the middle layer that pushes data from Shopify into GA4.
- Add this Measurement ID into Google Tag Manager inside your GA4 Configuration Tag.
- Publish your GTM container.
3) Add the GTM Container Code to Shopify
Copy your GTM container code and paste it into your Shopify theme’s code. This ensures tracking is live across your entire store. This might be a bit technical, but should be easy and straightforward.
Install GTM on storefront pages (theme.liquid)
1. Grab your GTM code
In Google Tag Manager, go to Admin → Install Google Tag Manager
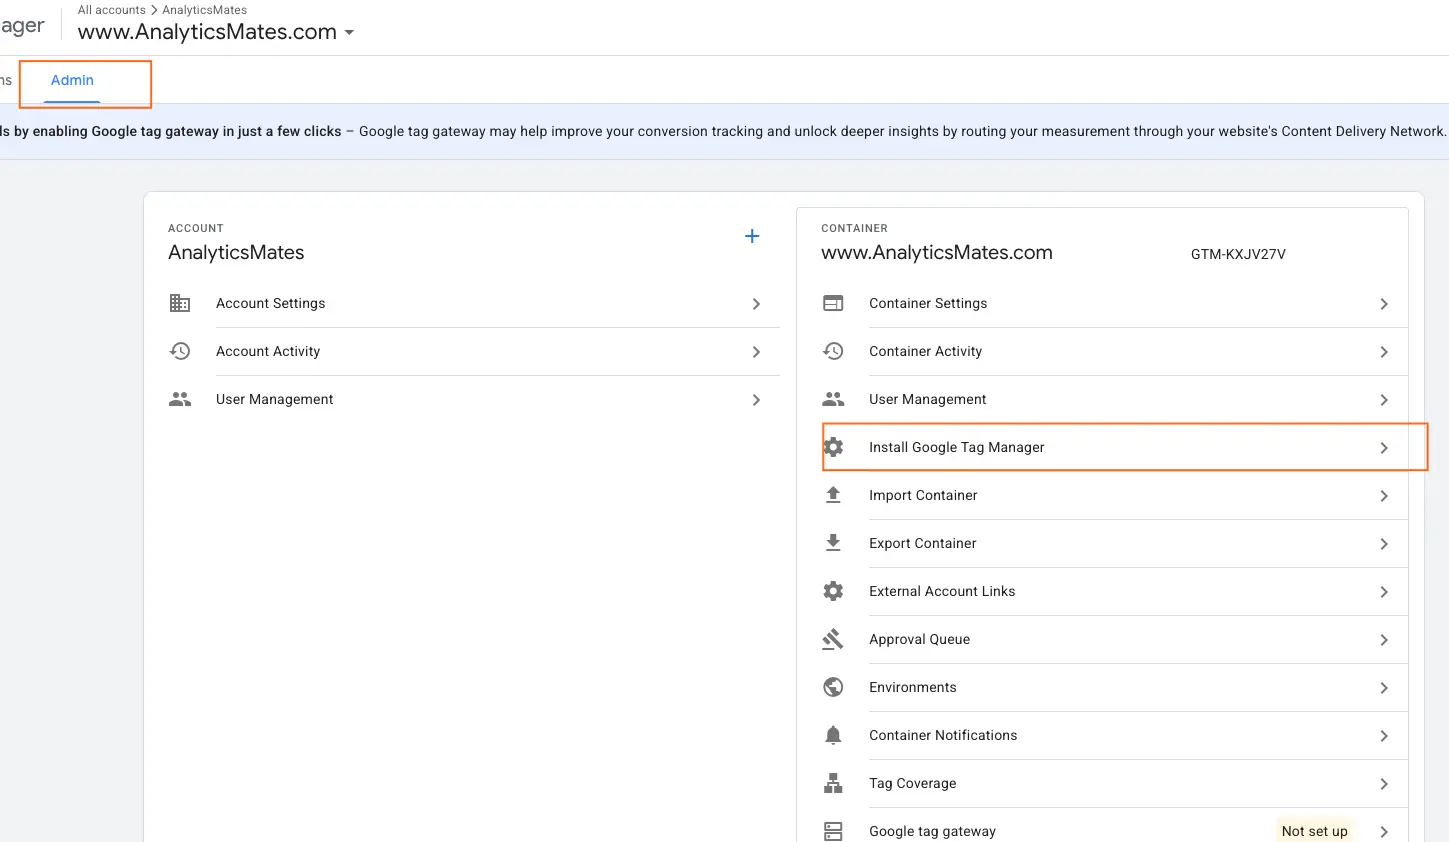
and copy the two snippets.
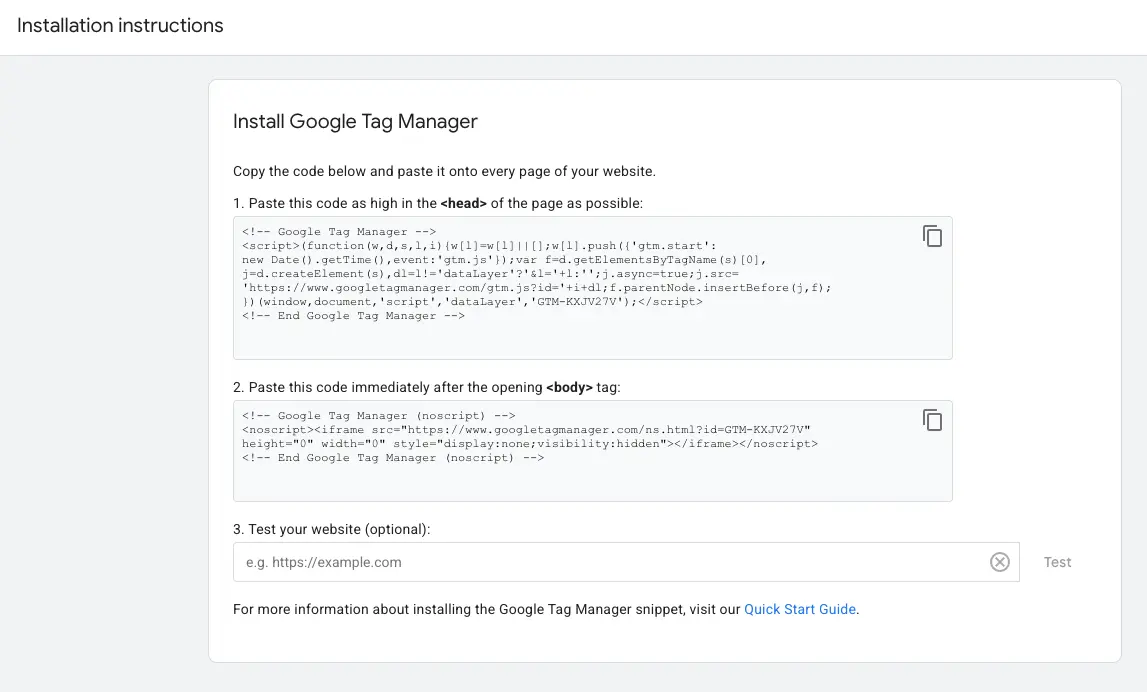
2. Open your Shopify theme
Shopify admin → Online Store → Themes → … → Edit code.
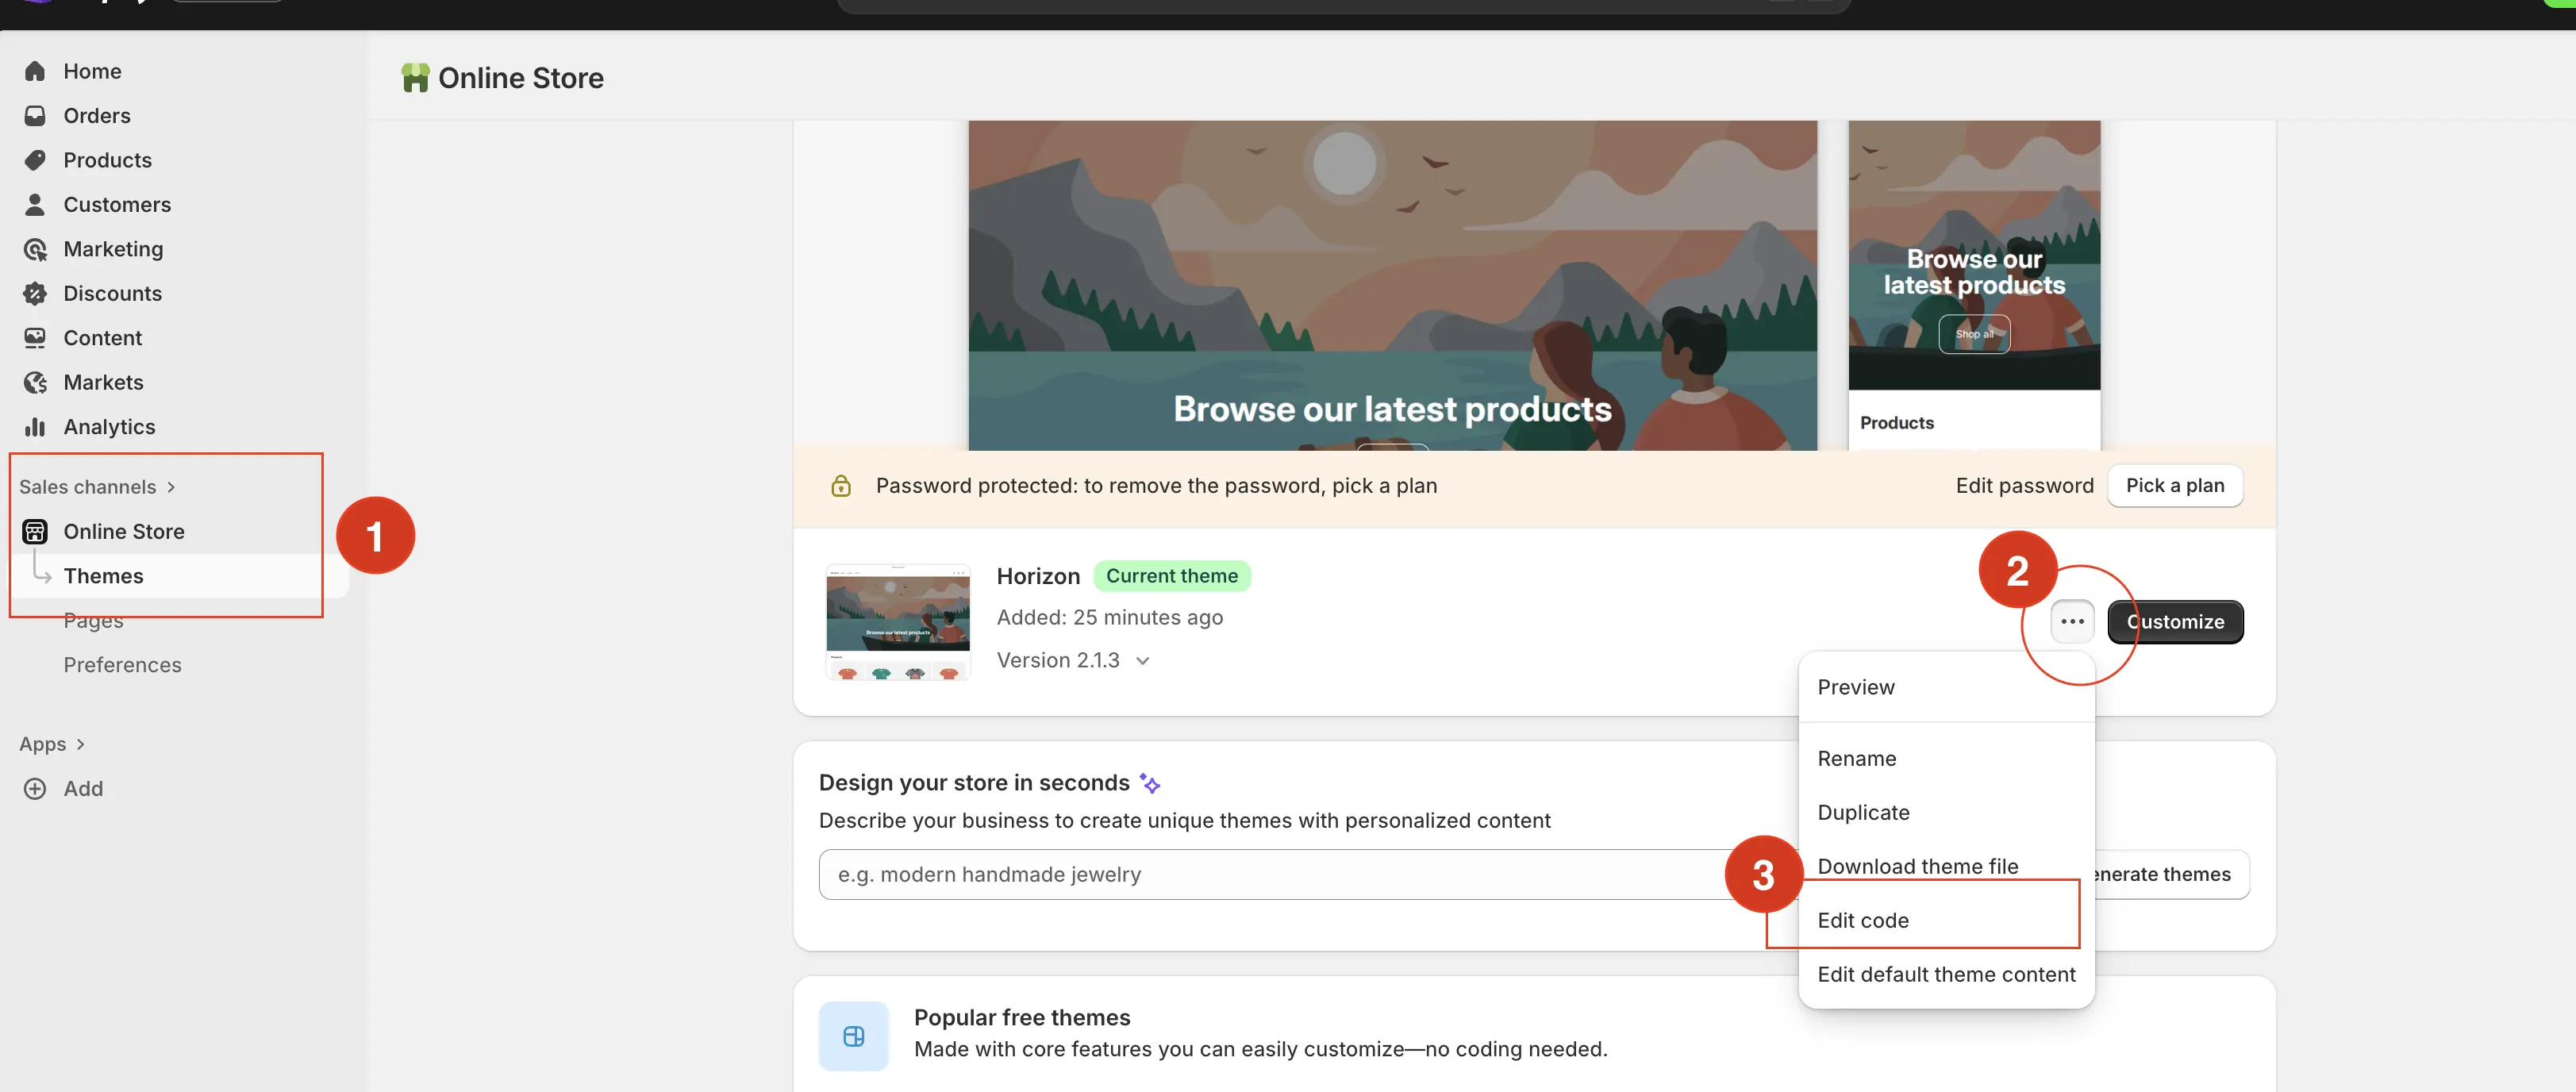
Go to Layout and look up for theme.liquid
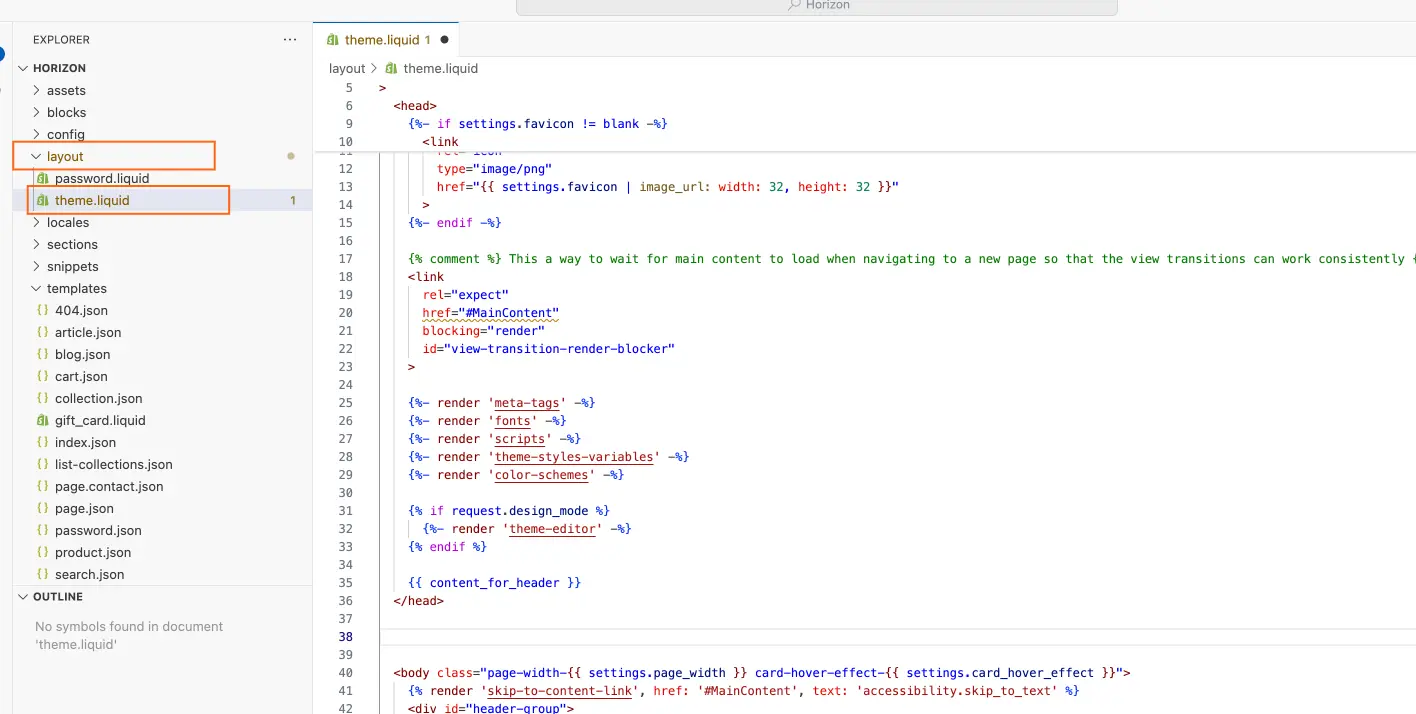
3. Paste the GTM snippets
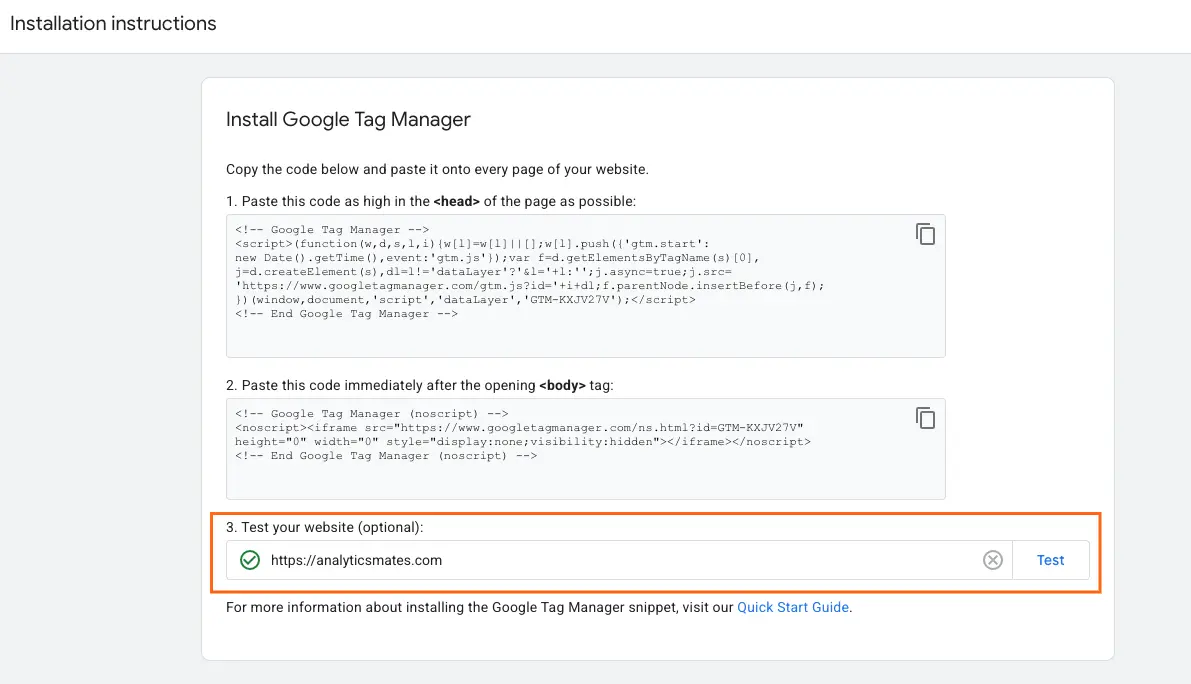
In layout/theme.liquid, paste the <script> snippet as high in the <head> of the page as possible:
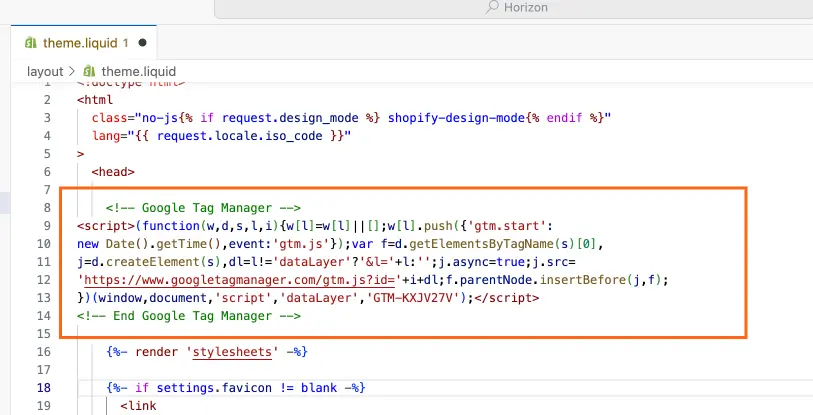
Paste the <noscript> iframe right after the opening <body> tag. Save your changes.
4. Verify the Installation
In the same section “Install Google Tag Manager ”, test your website. If you see a check, it means it’s working properly.
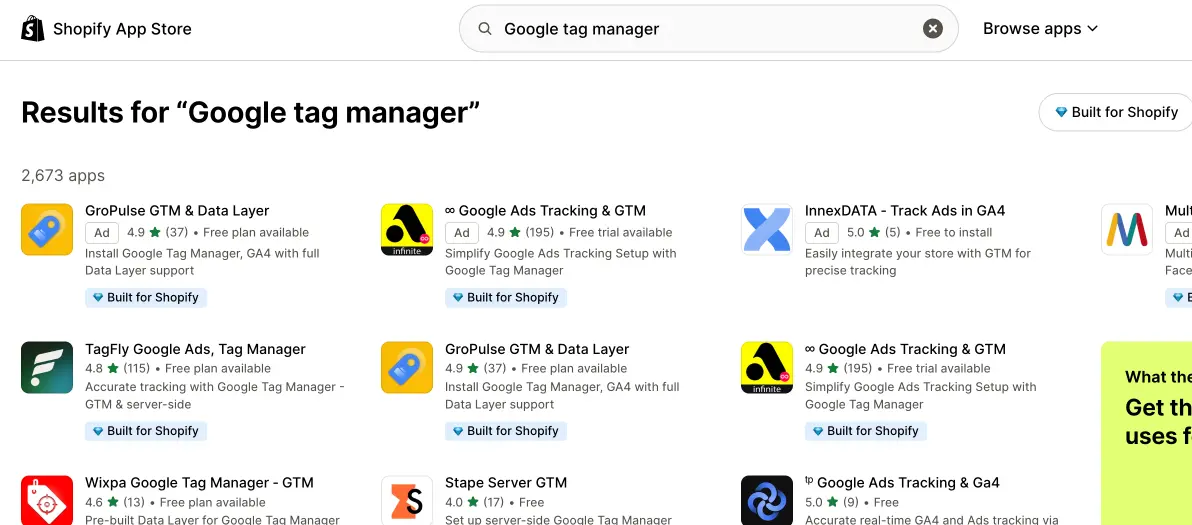
There are other easier ways to install this using apps like “GroPulse GTM & Data Layer” in Shopify App Store. You can check it out and follow the steps as presented.
Tracking Key Shopify Events (Data Layer) + Leveraging AI
In this section we’ll cover the step-by-step ways on how to track a sample Shopify event, “Add-to-cart” using data layer push. And also use AI to help us get GTM data layer push for Shopify key events.
Prerequisites
- GTM is installed on your Shopify theme.
- A GA4 Configuration tag already exists in GTM.
- You are not also using Shopify’s built-in GA4 at the same time.
Step A: Add a dataLayer push to your theme
This captures the product info when a shopper adds an item to cart.
- In Shopify, go to Online Store → Themes → … → Edit code.
- Open layout/theme.liquid and add this script just before the closing </head> tag:
<script>
// Ensure dataLayer exists
window.dataLayer = window.dataLayer || [];
// Listen for any "add to cart" form submission
document.addEventListener('submit', async function(e) {
const form = e.target;
if (!form.matches('form[action*="/cart/add"]')) return;
try {
// Find quantity and variant id from the form
const qtyInput = form.querySelector('input[name="quantity"]');
const variantInput = form.querySelector('input[name="id"]');
const quantity = qtyInput ? parseInt(qtyInput.value || '1', 10) : 1;
const variantId = variantInput ? variantInput.value : undefined;
// Get product context from ShopifyAnalytics if available
const product = (window.ShopifyAnalytics && window.ShopifyAnalytics.meta && window.ShopifyAnalytics.meta.product) ? window.ShopifyAnalytics.meta.product : null;
// Fallback product info if product context is missing
const itemName = product ? product.name : document.querySelector('h1')?.textContent?.trim() || 'Unknown product';
const price = product && product.variants && product.variants[0] ? (product.variants[0].price || 0) : 0;
const currency = (window.Shopify && Shopify.currency && Shopify.currency.active) ? Shopify.currency.active : 'USD';
// Push GA4-style ecommerce object
window.dataLayer.push({
event: 'add_to_cart',
ecommerce: {
currency: currency,
value: (Number(price) || 0) * quantity,
items: [{
item_id: String(variantId || product?.id || ''),
item_name: itemName,
price: Number(price) || 0,
quantity: quantity
}]
}
});
} catch (err) {
console.error('add_to_cart dataLayer push failed', err);
}
}, true);
</script>
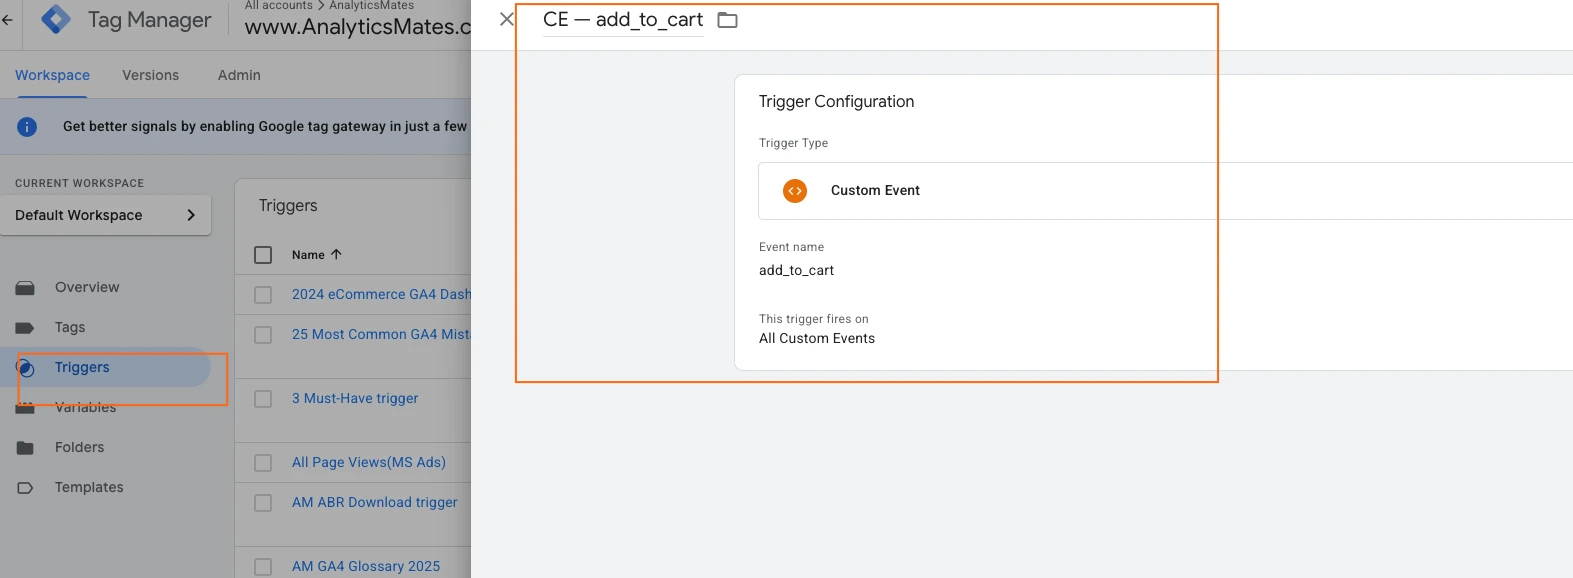
Step B: Create a Custom Event trigger in GTM
- Triggers → New → Custom Event.
- Event name: add_to_cart.
- This trigger fires on All Custom Events.
- Save as CE — add_to_cart.
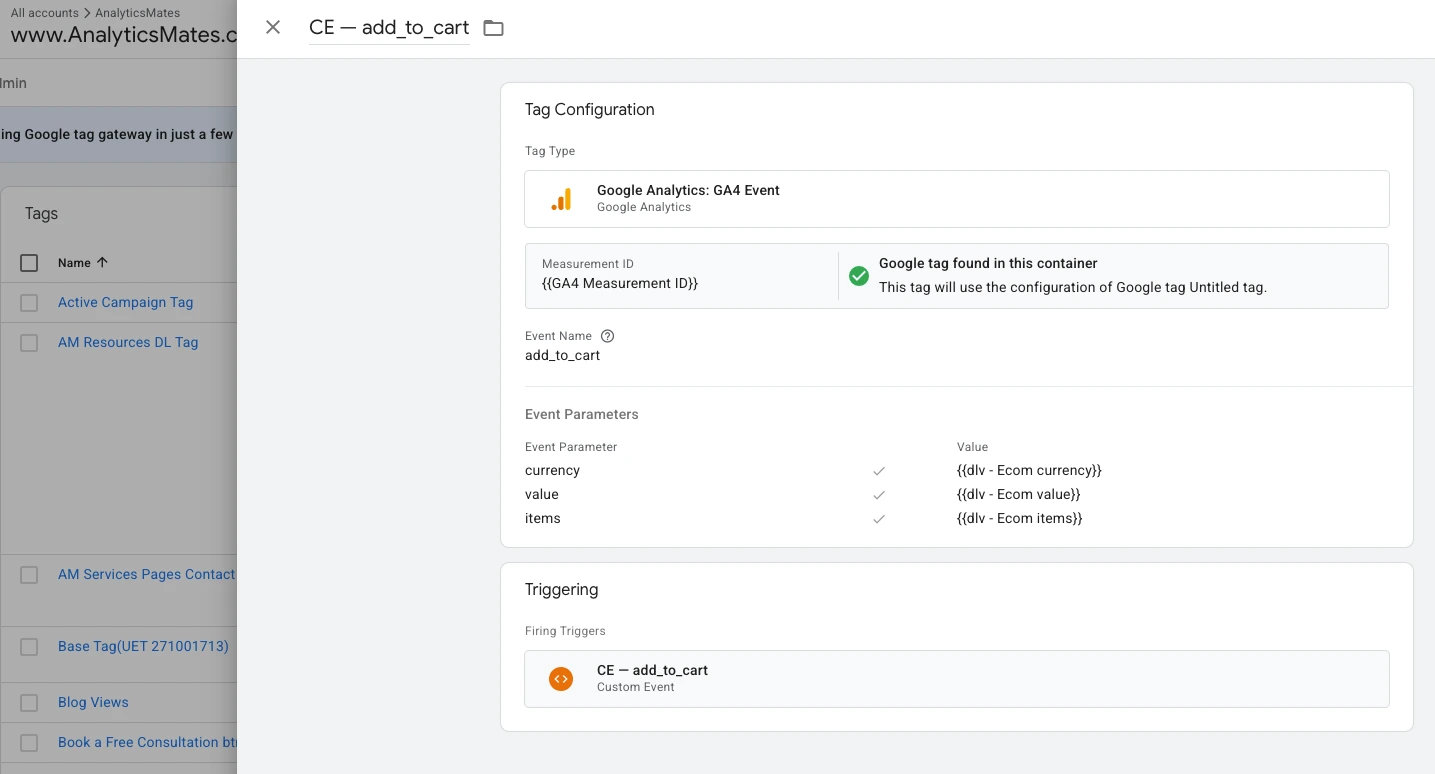
Step C: Create the GA4 Event tag in GTM
- Tags → New → GA4 Event.
- Configuration tag: your GA4 Configuration tag.
- Event name: add_to_cart.
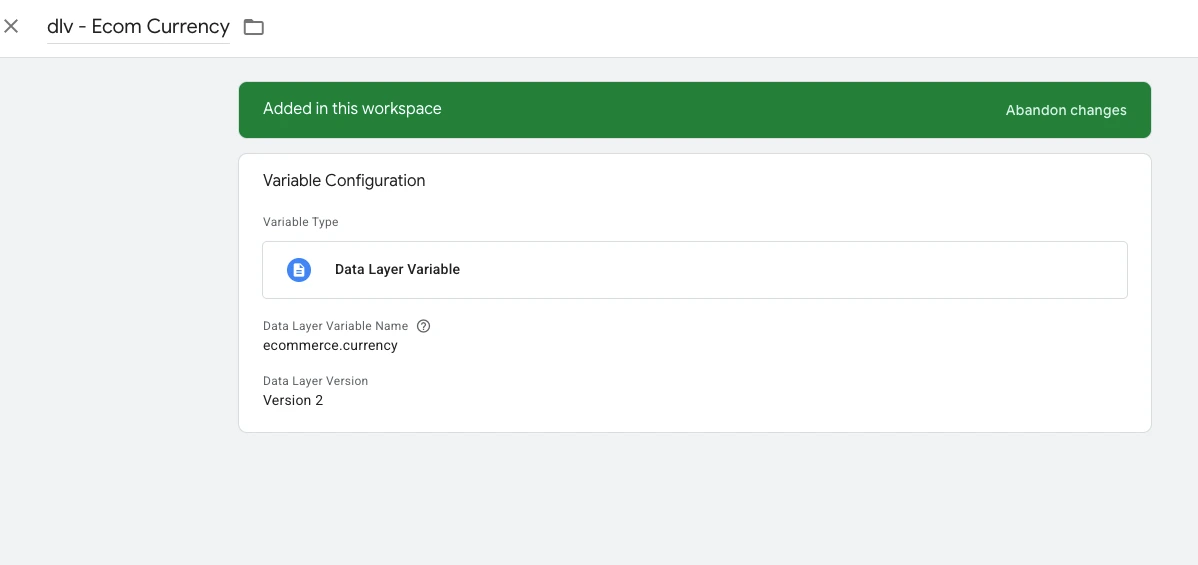
- Event parameters
- currency → Data Layer Variable ecommerce.currency
- value → Data Layer Variable ecommerce.value
- items → Data Layer Variable ecommerce.items
(Create each DLV under Variables → New → Data Layer Variable with the exact dot paths above.)
5. Trigger: CE — add_to_cart.
6. Save.
Step D: Test
- GTM Preview and connect to your store.
- Add a product to cart.
- Confirm the add_to_cart event appears in the GTM preview and in GA4 DebugView with the items array, value, and currency.
Leveraging AI for GTM Data Layer Push Code
In order to get the tracking event for the customer buying journey, we need to implement each of the important key events for Shopify. We can use AI, in this example we’re using ChatGPT to give us the rest of the data layer push for the following key events in Shopify.
- Standard e-commerce events: add_to_cart, begin_checkout, purchase.
- Other useful events: view_item, search, sign_up, newsletter opt-in.
You can use this ready to use prompt, which will provide you a JS file of the code and instructions on how to implement it.
Create a downloadable, ready-to-use package for Shopify that implements GA4-friendly GTM dataLayer pushes for these events: view_item, add_to_cart, begin_checkout, purchase, search, sign_up, and newsletter opt-in (use generate_lead). Include a production-ready JavaScript file and a short install guide (how to add the script to theme.liquid and map parameters in GTM). Output only the files, no extra commentary.
Once you have the output, just follow the instructions from the AI on how to implement it.
FAQs
Do I need both GA4 and GTM for Shopify, or is GA4 enough on its own?
You can technically run GA4 on its own by adding the tracking code directly into Shopify. But pairing it with GTM gives you much more flexibility. GTM acts as a control center where you can manage all your tags, events, and third-party tools in one place without constantly touching your site’s code.
Will setting up GA4 through GTM slow down my Shopify site?
No, not if it’s done correctly. GTM loads asynchronously, which means it doesn’t block your site from loading. In fact, GTM often makes things easier to manage and can help prevent performance issues that come from adding multiple tracking codes manually..
Can I track events like “newsletter signups” or “video views” in GA4?
Yes. GA4 is very flexible, you can track almost any user interaction. With GTM, you can set up triggers for sign-ups, button clicks, video plays, and more. These go beyond standard e-commerce events and give you a deeper view of how people engage with your store.
What’s the difference between GA4’s built-in Shopify integration and a GTM setup?
The built-in Shopify integration is quick to install but fairly limited. It often misses key events and doesn’t give you full control. GTM, on the other hand, lets you customize your setup, add advanced tracking, and connect with other platforms like Meta Ads, LinkedIn, or TikTok.
How do I know if my GA4 events are firing correctly?
You can check using GA4’s DebugView or GTM’s Preview Mode. Both tools let you see events in real time and confirm whether data is flowing correctly. Running a test purchase or signup is a good way to validate that your setup is accurate.
Do I need coding skills to set this up, or can it be done without a developer?
For most standard setups, you don’t need to code. GTM is designed to make event tracking more accessible, and GA4 comes with a lot of built-in e-commerce options. For advanced customizations, light coding might help, but many Shopify owners handle the basics without a developer.
How often should I review or update my GA4 setup for Shopify?
At minimum, review your setup quarterly. Your store evolves, new products, campaigns, or site changes might mean new tracking needs. It’s also smart to check whenever Google releases GA4 updates or when you roll out major changes to your store design.
What’s the easiest way to build dashboards once my tracking is in place?
Looker Studio (formerly Data Studio) is a free and easy option. You can connect GA4 to it and build dashboards that update automatically. From there, you can visualize sales, traffic, and customer behavior without digging through raw GA4 reports.
If I already use another analytics tool, should I still set up GA4 + GTM?
for digital tracking. It integrates with Google Ads and other platforms seamlessly, and having it set up ensures you won’t miss important insights, plus, it future-proofs your data collection.
Final Words
All of these that we shared above is just one way of integrating Shopify with GA4 through GTM. There’s a lot of other approaches out there that could be easier or better. We believe that what this method provides is a more flexible way of tracking and collecting granular data.
So, to wrap this up, remember that setting up GA4 and GTM on your Shopify store isn’t just a tech chore, it helps you see clearly so you can grow confidently. With a proper setup, you’ll see which channels actually pull their weight, which products show the most interest, and where shoppers actually drop off.
This, and a bit of AI and it gets even better. It can suggest events you might miss and keep your naming tidy, so your reports stay clean and useful. Clean data equals better decisions, smarter campaigns, more sales.
Thank you for reading!
We're always looking for ways to improve our Google Analytics 4 blog content. Please share your feedback so we can make it even better.
See Article Images


