How to Use AI for Smarter GTM Tagging and Performance Optimization

Google Tag Manager lets you track just about anything on your site, but getting it set up properly isn’t always simple. Especially if you are working with things like custom code or the data layer, it can get pretty technical, but that doesn’t mean you have to settle for a workaround. Here is where we need to sometimes get help from AI.
Same as when let’s say you’re trying to troubleshoot a GA4 event that’s not firing correctly, or maybe Search Console throws up a strange error and you’re not sure what to make of it. You can feed that data into an AI tool and ask for suggestions or even next steps to take. In this blog post, we’ll cover and share with you how to leverage AI tools in these situations.
Why Google Tag Manager (GTM) Can Feel Like a Roadblock
Google Tag Manager (GTM) offers flexibility, allowing us marketers to manage event tracking without heavy developer support. But once you move beyond basic tags, it can quickly feel complex. Setting up things like custom events often requires technical knowledge of triggers, variables, and the data layer, turning what seems simple into a time-consuming challenge.
Because of this, many teams stick to default setups and avoid advanced tracking altogether. While that might feel safer, it also means missing out on valuable insights into user behavior. We’ve been there too, but the good thing is that AI tools can now help bridge that gap. Let’s take a look at a few examples of how we can use AI to help us with these tracking efforts.
Practical Custom HTML Tag Scenarios
Scenario: Handling Non-Standard Form Submissions in GTM
You’re working with a website that uses a non-standard form, such as one built with AJAX, embedded within an iframe, or custom-coded without triggering traditional submit events. As a result, Google’s built-in GTM form submission trigger doesn’t detect the form activity, making it difficult to track conversions or user input.
Your goal is to track either a successful form submission (e.g., a confirmation message appears or the form resets) after the form is submitted, without direct access to the backend.
Before we move on to the next steps, here’s an AI prompt you can use to generate the value for your Custom HTML tag: AI Prompt: GTM Custom HTML Tags
Step 1: Understand the Custom HTML Tag (The Code)
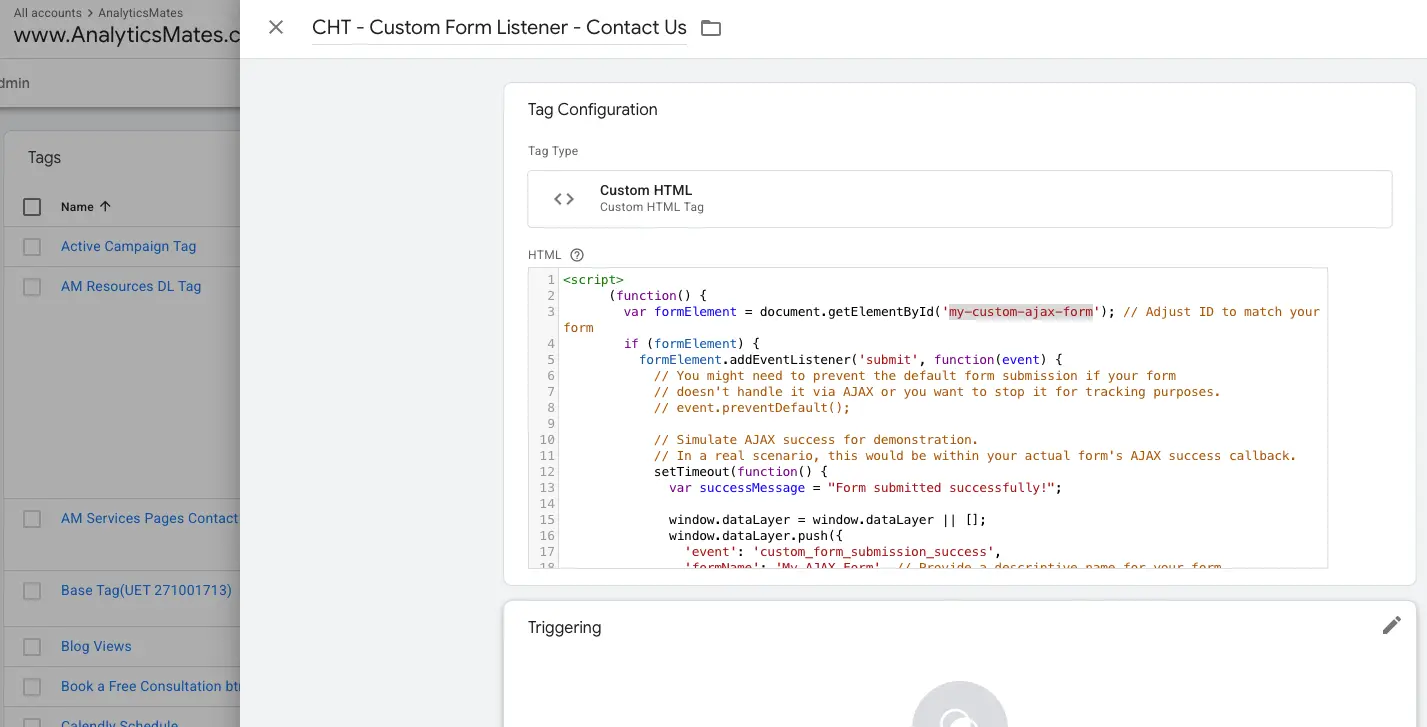
Here’s the CustomHTML code:
(function() {
var formElement = document.getElementById(‘my-custom-ajax-form’); // Adjust ID to match your form
if (formElement) {
formElement.addEventListener(‘submit’, function(event) {
setTimeout(function() {
var successMessage = “Form submitted successfully!”;
window.dataLayer = window.dataLayer || [];
window.dataLayer.push({
‘event’: ‘custom_form_submission_success’,
‘formName’: ‘My AJAX Form’, // Provide a descriptive name for your form
‘submissionMessage’: successMessage,
‘pagePath’: window.location.pathname
});
}, 500); // Simulate network delay
});
}
})();
Before you start in GTM:
- You must know the id attribute of the HTML form you want to track. In the code above, it’s my-custom-ajax-form. If your form doesn’t have an ID, you might need to ask a developer to add one, or use a more complex CSS selector (which is beyond this guide’s scope but possible).
- If your form uses AJAX, the dataLayer.push should ideally happen after the AJAX request successfully completes, not just when the submit button is clicked. The setTimeout in the example simulates this. You’d typically integrate window.dataLayer.push into your website’s existing JavaScript that handles the AJAX success.
Step 2: Create the Custom HTML Tag in GTM
1. Log in to GTM: Go to tagmanager.google.com and select your container.
2. Navigate to Tags: In the left-hand navigation, click on Tags.
3. Create a New Tag: Click the New button.
4. Tag Configuration:
- Click on Tag Configuration.
- Choose Custom HTML as the Tag Type.
- Paste the Code: Copy the entire code block from Step 1 above (including the
- Important things to consider and check:
- Change ‘my-custom-ajax-form’ to the actual ID of your form.
- Change ‘My AJAX Form’ to a descriptive name for your form that will appear in your analytics reports (e.g., ‘Contact Us Form’, ‘Newsletter Signup’).
5. Tag Firing Options:
- Check Support document.write (even though we’re not using it, it’s good practice for custom HTML).
- Tag Firing Options: Keep as ‘Once per page’.
6. Naming Your Tag: Give your tag a clear, descriptive name. Something like:
- CHT - Custom Form Listener - [Form Name] (e.g., CHT - Custom Form Listener - Contact Us)
7. Choose a Trigger: This tag needs to load on the page where your form exists.
- Click on Triggering.
- For simplicity, you can initially select All Pages.
- More advanced: If the form is only on specific pages, you can create a ‘Page View’ trigger with a Page Path condition (e.g., Page Path equals /contact-us).
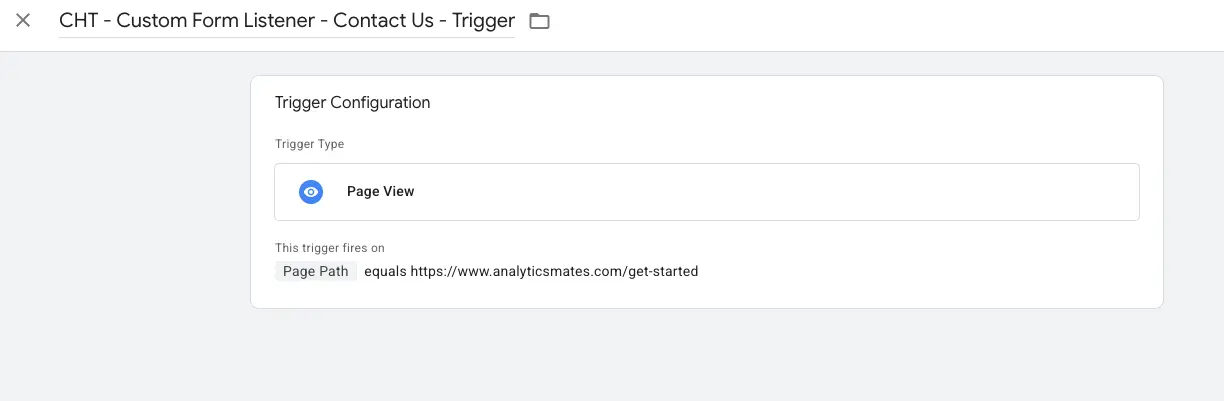
8. Save the Tag: Click Save.
Step 3: Create the Custom Trigger in GTM
This trigger will “listen” for the custom_form_submission_success event that your Custom HTML tag pushes to the Data Layer.
1. Navigate to Triggers: In the left-hand navigation, click on Triggers.
2. Create a New Trigger: Click the New button.
3. Trigger Configuration:
- Click on Trigger Configuration.
- Choose Custom Events as the Trigger Type.
- Event Name: In the “Event name” field, type custom_form_submission_success.
- Important: This name must exactly match the event value in your Custom HTML tag’s dataLayer.push.
- This trigger fires on: Select All Custom Events. (If you have a very high volume of dataLayer events and want to optimize, you could choose ‘Some Custom Events’ and add a condition like Event equals custom_form_submission_success, but All Custom Events is fine here).
4. Naming Your Trigger: Give your trigger a clear, descriptive name. Something like:
- CE - Form Submission Success - [Form Name] (e.g., CE - Form Submission Success - Contact Us)
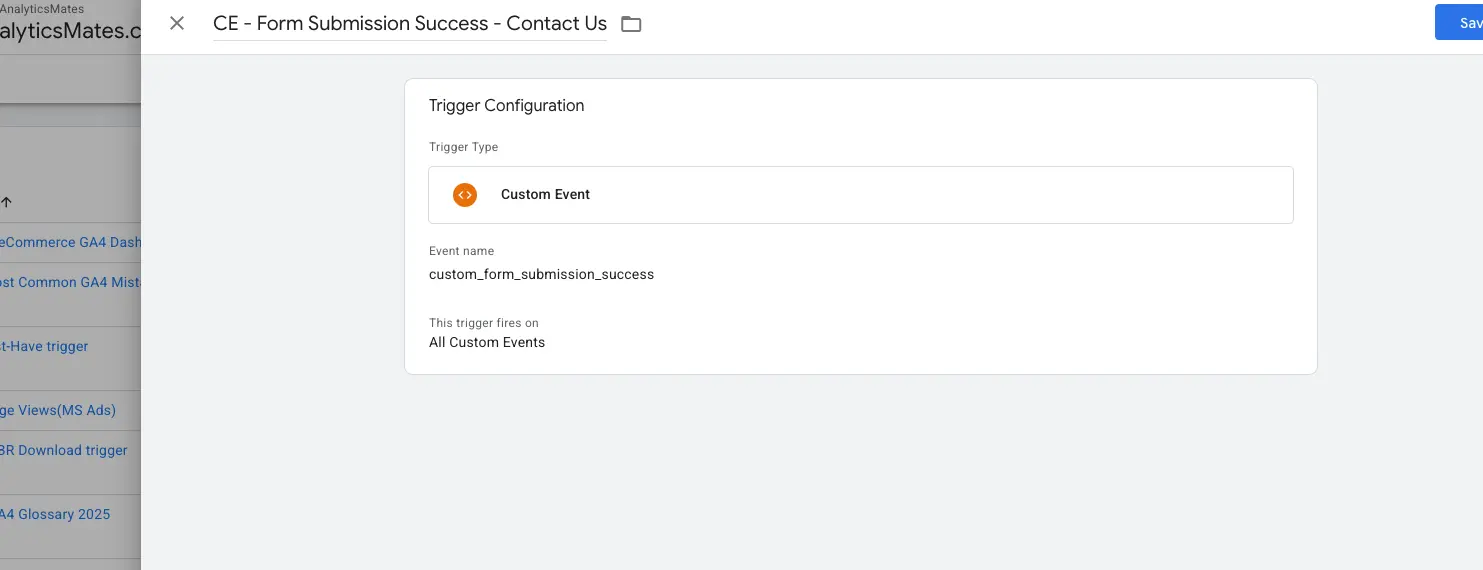
5. Save the Trigger: Click Save.
Step 4: Create Your Analytics Tag (e.g., Google Analytics 4 Event Tag)
Now, connect your custom trigger to an analytics tag that will send the data to your desired platform.
1. Navigate to Tags: Go back to Tags.
2. Create a New Tag: Click the New button.
3. Tag Configuration:
- Click on Tag Configuration.
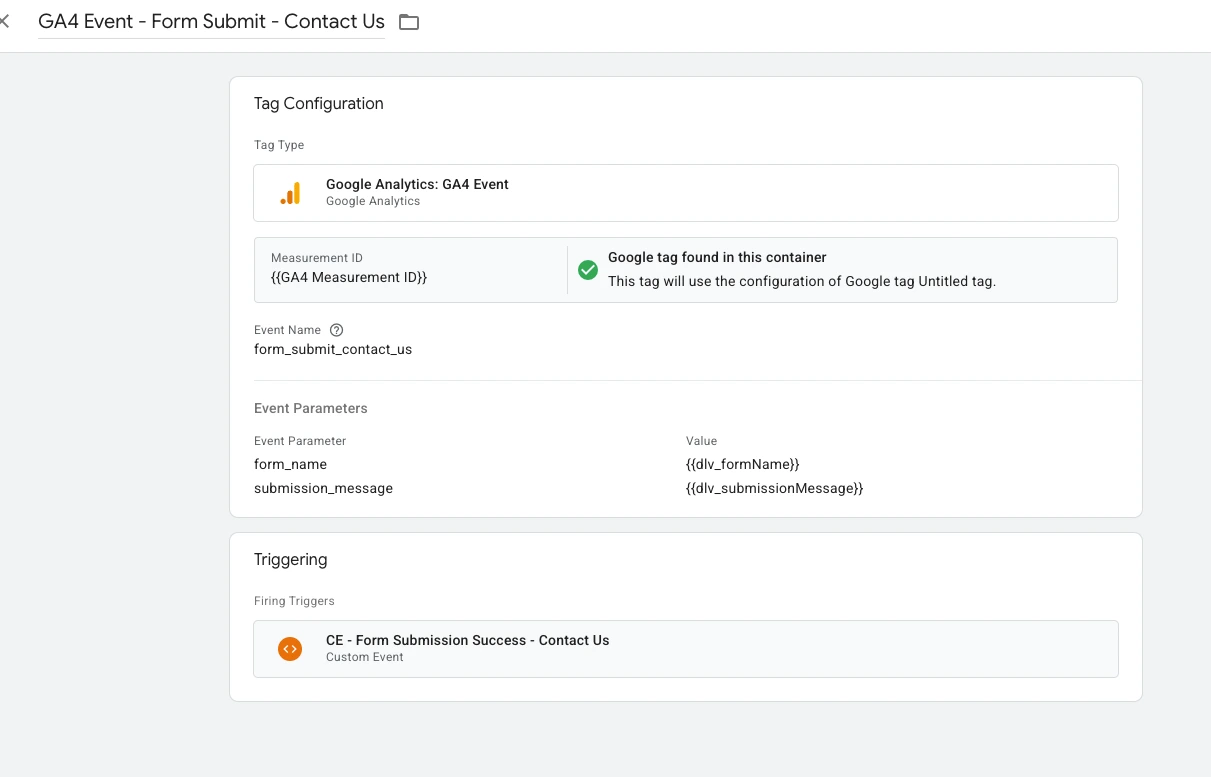
- Choose your analytics platform, e.g., Google Analytics: GA4 Event.
- Configuration Tag: Select your existing GA4 Configuration Tag (e.g., GA4 - Config).
- Event Name: Type in a descriptive event name that will appear in GA4 reports, e.g., form_submit_contact_us.
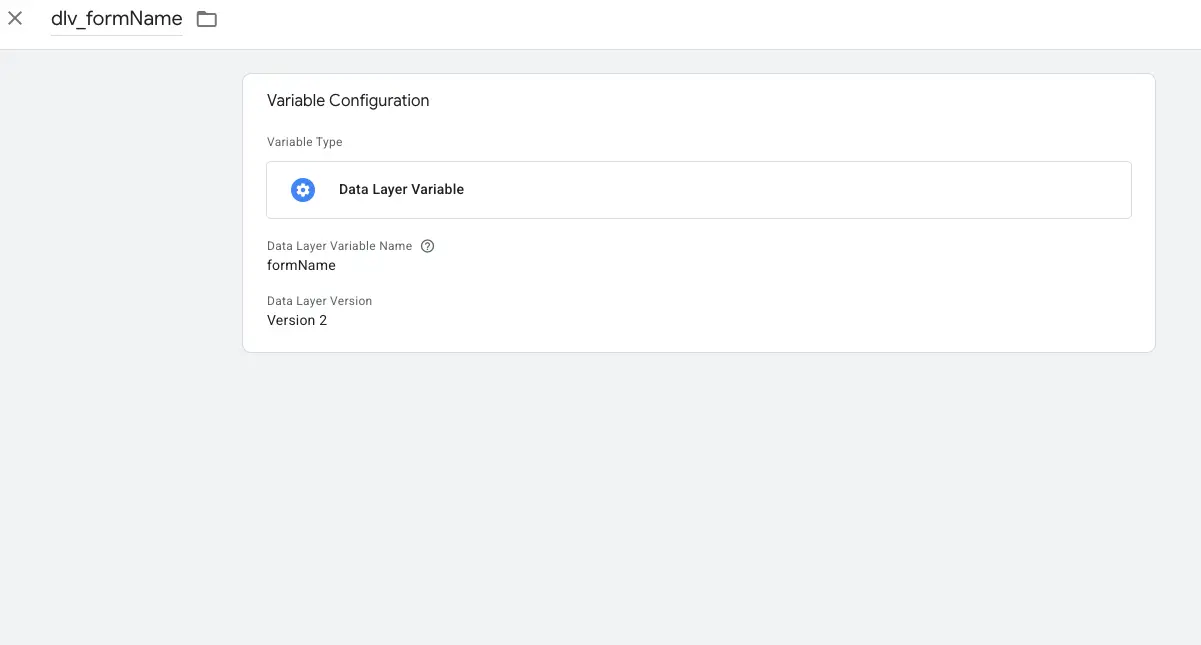
- Event Parameters: To send the additional data you pushed (form name, message), add Event Parameters:
- Click Add Row.
- Parameter Name: form_name
- Value: Click the building block icon and select Data Layer Variable. Create a new Data Layer Variable, name it dlv_formName, and set its “Data Layer Variable Name” to formName. Save.
- Parameter Name: submission_message
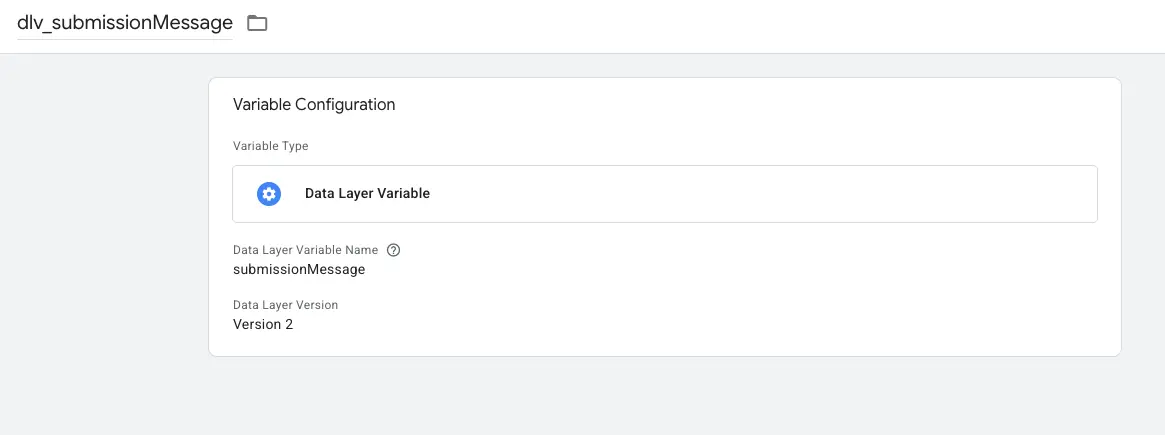
- Value: Click the building block icon and select Data Layer Variable. Create a new Data Layer Variable, name it dlv_submissionMessage, and set its “Data Layer Variable Name” to submissionMessage. Save.
4. Triggering:
- Click on Triggering.
- Select the custom trigger you just created: CE - Form Submission Success - [Form Name].
5. Naming Your Tag: Give your tag a clear, descriptive name. Something like:
- GA4 Event - Form Submit - [Form Name] (e.g., GA4 Event - Form Submit - Contact Us)
6. Save the Tag: Click Save.
And that’s it, you need to test and ensure that the tags are firing.
Here are some additional high-impact examples. While we won’t go into the step-by-step setup in GTM, these illustrate the types of tracking you might be curious about but unsure how to implement. For each use case, we’ve included an AI prompt to help you generate the necessary code and get started quickly.
Dynamic Scroll Depth Tracking with Element Visibility
Unlike GTM’s built-in Scroll Depth trigger which only tracks when users scroll past certain percentages of the page Element Visibility triggers offer a more precise way to measure engagement by detecting when specific elements actually appear within the user’s viewport. This is especially useful for tracking interaction with key content sections like Calls to Action (CTAs), product features, or banners.
Scenario: Track When a CTA Section Becomes Visible
You want to fire a GTM event when a user scrolls down and a specific section of the page your Call to Action block with the ID cta-section, enters the viewport. This will help you understand how many users actually see the CTA, not just how far they scroll.
AI Prompt: GTM Custom HTML Tags
Capturing Text from an “Add to Cart” Confirmation Pop-up
In modern eCommerce setups, key user interactions like adding a product to the cart are often followed by dynamically generated UI elements such as pop-ups or toast notifications. These pop-ups may briefly display valuable information (e.g., the product name just added), but that data isn’t always available in the dataLayer or accessible from the product page DOM.
Scenario: Capture Product Name from a Dynamic ‘Add to Cart’ Confirmation Pop-up
Your website shows a pop-up confirmation after a user adds an item to their cart. The message might say something like: “Item X has been added to your cart.”
However, “Item X” isn’t pushed to the dataLayer and isn’t part of the static page content, it’s injected dynamically via JavaScript. You want to capture “Item X” and send it to Google Analytics 4 (or other tools) for tracking and analysis.
AI Prompt: GTM Custom HTML Tags
Simply input these prompts into your preferred generative AI tool to generate a starting point for building your custom event tracking in GTM.
Performance Optimization
We’ve included this bonus section to show you how to use AI to gain deeper insights into your website’s performance. A great example is analyzing your Core Web Vitals report from Google Search Console. Here are the steps:
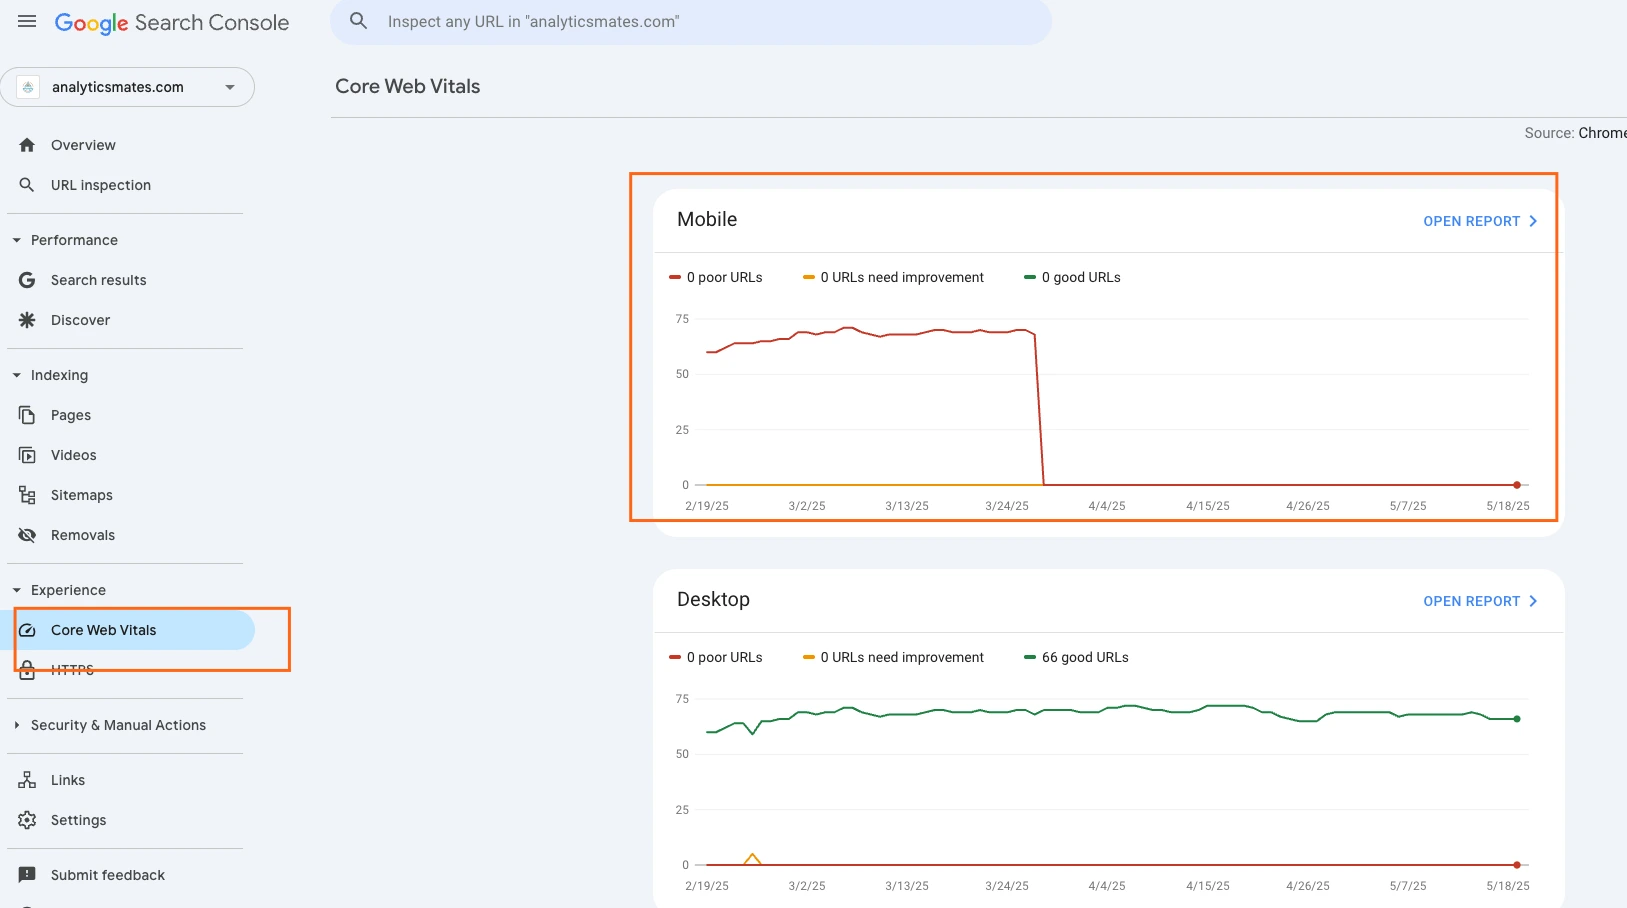
1. Go to Google Search Console
2. Select your website property.
3. In the left-hand menu, click “Core Web Vitals.”
4. You’ll see two tabs: Mobile and Desktop: choose one to start with. Click “OPEN REPORT”
5. At the top-right corner of the report, click the Export icon.
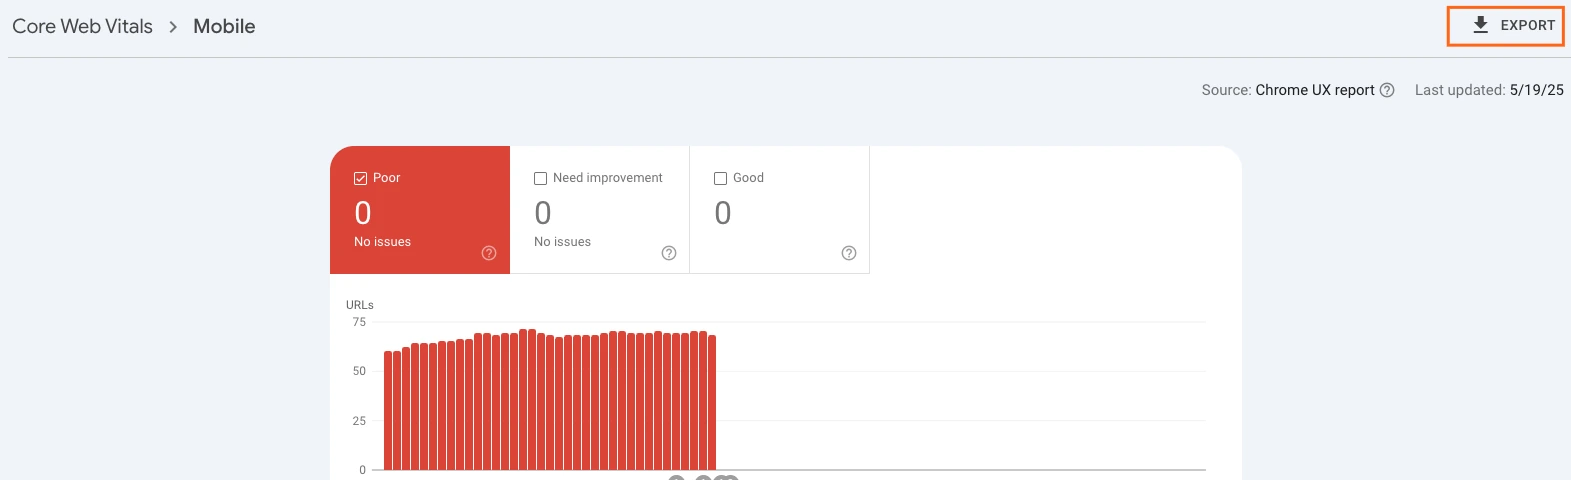
6. Choose “Download CSV”.
7. Save the file to your computer.
Use an AI Prompt to Analyze the Report
Once you have the CSV file, upload it to your preferred AI tool (like ChatGPT) and use a prompt like:
_Please analyze this CSV file and give me actionable insights and optimization recommendations based on my website’s Core Web Vitals data. I’m particularly interested in understanding what’s working, what’s not, and how I can improve performance._
More formal and refined prompt:
I am providing Core Web Vitals data exported as a CSV from Google Search Console for my website. Each row represents a URL with its corresponding performance metrics (LCP, FID, CLS) and status (Poor, Needs Improvement, Good).
Please analyze this data thoroughly and provide a structured, actionable performance summary. I need insights that help me understand:
- Overall Performance Snapshot: A high-level overview of my site’s Core Web Vitals status across mobile and desktop (if combined, or per report if separated). Which metrics are generally performing well, and which are struggling the most?
- Key Problem Areas & Affected URLs: Identify the most significant performance bottlenecks (e.g., high LCP, high CLS, high FID) and the specific URLs or URL patterns that are most heavily impacted.
- Prioritized, Actionable Optimization Recommendations: For each identified problem area, provide concrete, implementable steps to improve the Core Web Vitals metrics. Please prioritize these recommendations based on their potential impact and common causes.
- Potential Root Causes: Explain the likely underlying reasons for the observed poor performance (e.g., unoptimized images, render-blocking resources, third-party script impact, layout shifts from ads/dynamic content, slow server response).
- Positive Trends/Successes (What’s Working): Highlight any areas where my Core Web Vitals are performing well (e.g., pages consistently in the ‘Good’ category, or metrics showing good scores).
Present the analysis in a clear, organized format, using headings or bullet points for readability.
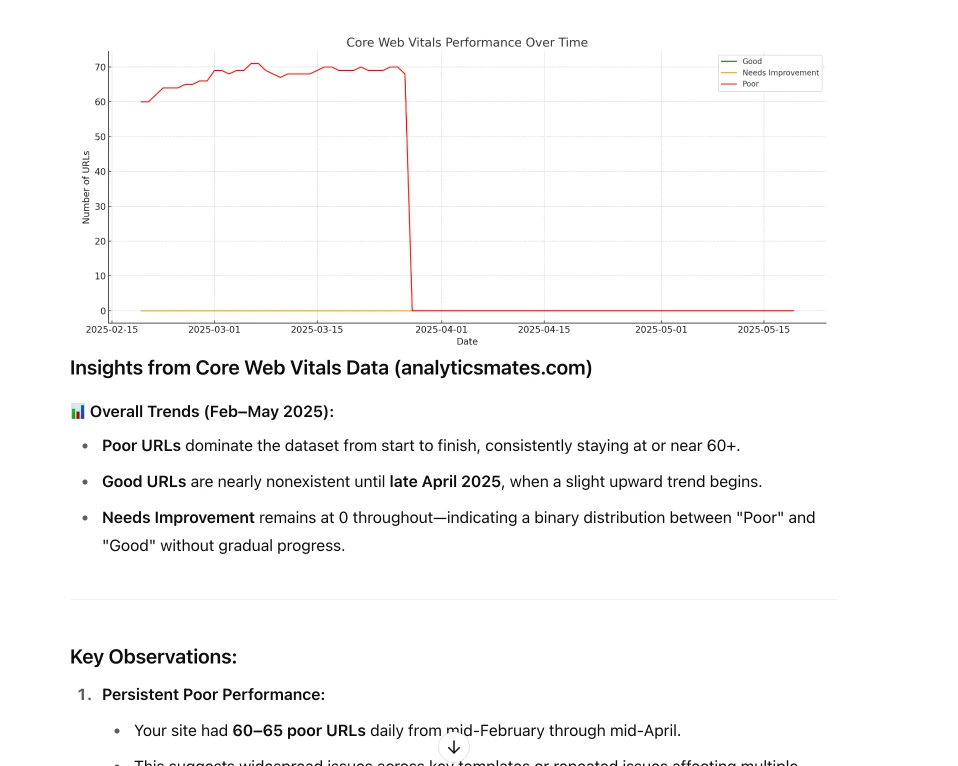
It should generate an output similar to the example below. You can always refine the prompt further depending on the specific insights or details you’re looking for.
Final Word
This is the end of the post and we just want to say that even though tools like Google Tag Manager and Google Analytics 4 can sometimes feel a bit overwhelming, especially when you’re trying to work with custom setups or troubleshooting why something isn’t working as expected and you don’t have to figure everything out on your own. AI can help when things get too technical or consumes time and effort. Always remember that It’s not about relying on AI for everything, it’s about knowing when to use it to save time and do things efficiently. Just stay curious, test as you go, and use the tools that help you focus on what really matters, and that is getting better results from your data.
Thank you for reading!
We’re always looking for ways to improve our Google Analytics 4 blog content. Please share your feedback so we can make it even better.
Work with us
Need this done for your property?
Analytics Mates handles GA4 setup, GTM implementation, Looker Studio dashboards, and the ongoing measurement operations that agencies and in-house teams don't have bandwidth for.