


Introduction:
The Data Layer is a scientific name that you might not understand. But it's just a group of information that Google Tag Manager (GTM) uses to keep track of and control your website and its users. Let's make it even simpler to understand. The Data Layer is like a train stop. Page views, product views, and buy events are all different types of data. They are like trains that arrive at the stop. GTM guides the trains to the right stations, much like a train conductor.
To put it another way, the Data Layer stores all of your website's data in one place so that tracking tools like Google Analytics can get it and use it. The Data Layer gives you a planned and organised way to gather information instead of just using HTML elements or JavaScript events to do so. This makes it easier to properly track what users are doing.
It's possible to track things very well with the Data Layer, but only if you understand how to use it properly. That's why we wrote this blog post. We'll go over the Data Layer in more detail, talk about common issues and mistakes, and share the best ways to make the implementation go smoothly.
Putting the Data layer into GTM
This piece of code should be added by your developer to the <head> part of your website, above the container snippet. This will set up the Data Layer.
<script>
window.dataLayer = window.dataLayer || [];
</script>
When you run this script, window.dataLayer will be set to window.dataLayer || [];
We can move on to the next step once you've put the Data Layer snippet in the right place on your website. First, though, let us talk about how the Data Layer works.
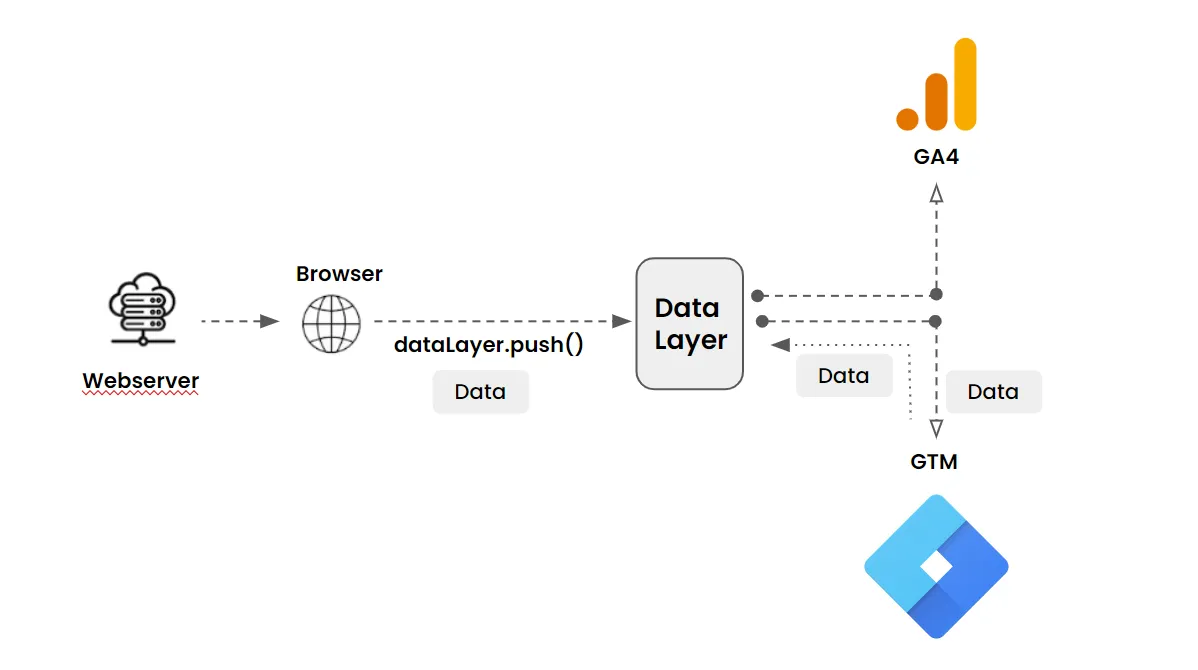
GTM can then use the Data Layer to fire tags when certain events occur. For instance, we could set up a trigger that sends a Google Analytics tag whenever someone clicks on a link on our website that leads to a different page.
Here is a picture of what it looks like:
The next step is to push data (information) into the data layer. Here is a simple example of how to push the author of a blog post once a visitor clicks on that particular blog post link using the dataLayer.push() method:
<script>
window.dataLayer = window.dataLayer || [];
window.dataLayer.push({
'event': 'Blog View',
'Author': 'Gary Spagnoli',
'Blog Post Title: 'How to Set Up Standard and Custom Reports in GA4'
});
</script>
Data Layer Variables
Google Tag Manager does not automatically recognize custom data in the data layer. You cannot use regular variables to store custom data from the data layer. To use custom data, you must create a data layer variable. Here are the steps:
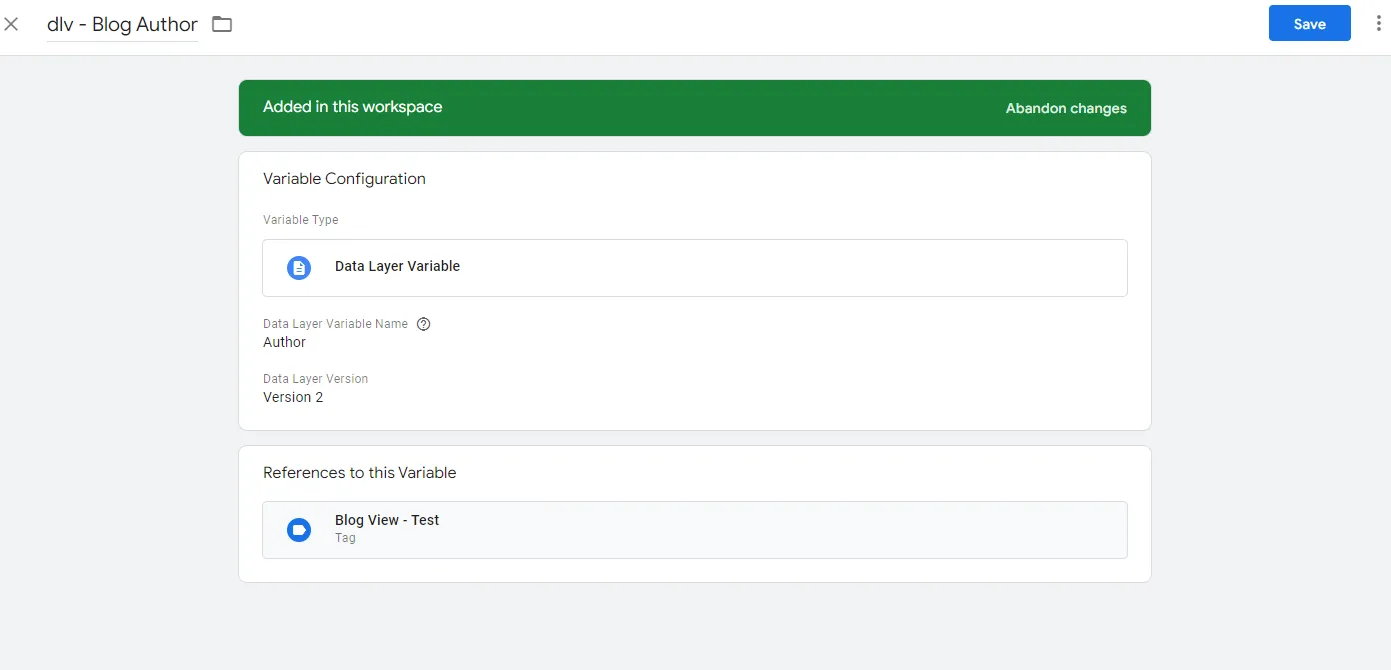
Once you have the key that you would like to work with, you can proceed to create a data layer variable:
- Click Variables.
- Under User-Defined Variables, click New.
- Click Variable Configuration and select Data Layer Variable as the variable type.
- In the Data Layer Variable Name field, enter the key exactly as it was written in the code (e.g. Author, not Blog Author.)
- In most cases you should leave the Data Layer Version set to the default value of Version 2. Learn more.
- Save the variable.
- Repeat these steps for every data layer key that you would like to have available as a variable in Tag Manager.
- Publish the container.
Note: Data Layer Variable Name field is case sensitive, this is because that is the name of the parameter that is stored in the data layer.
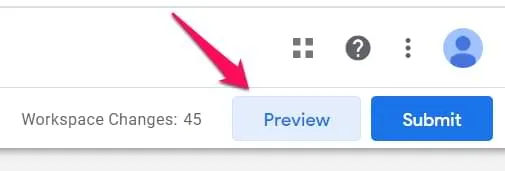
Now that we’re all set, the next step would be to check if the variable will come up in the preview and debug mode in GTM.
Yes, it is there!
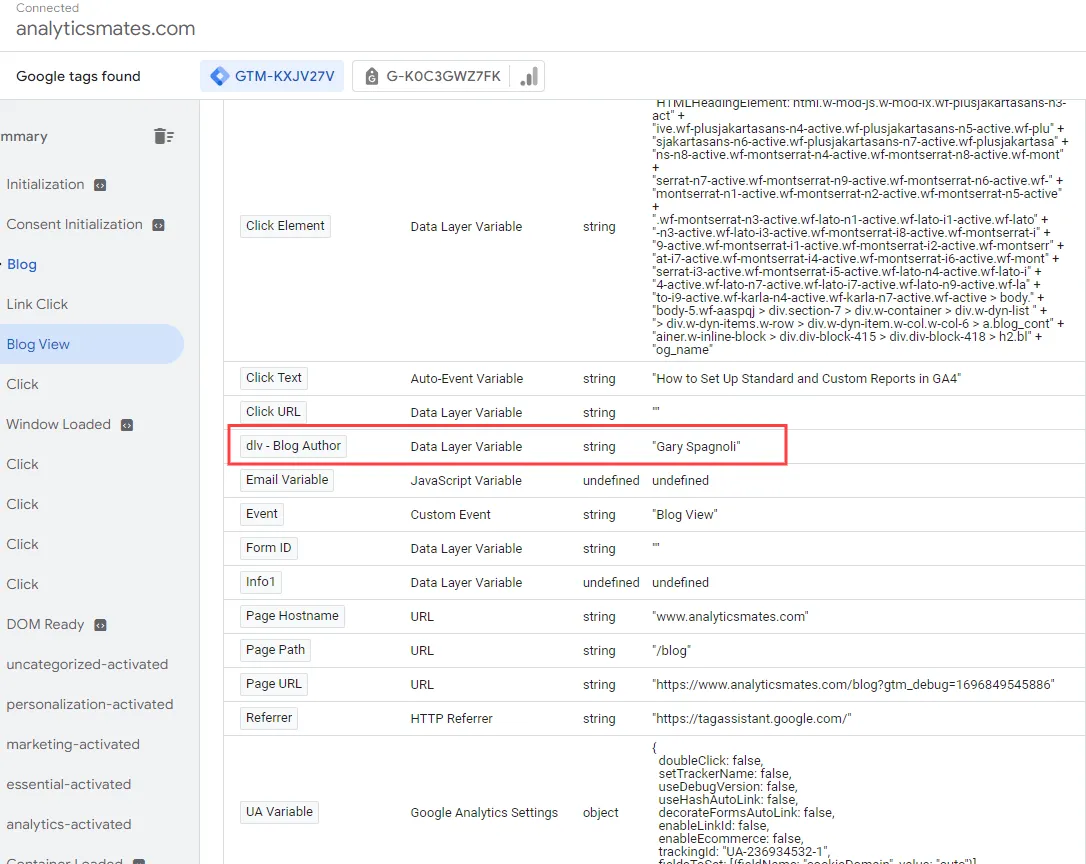
Your data has been sent to the data layer. You can now get it back and use it to make reports, like a Google Analytics report that tells you which author's content gets the most activity.
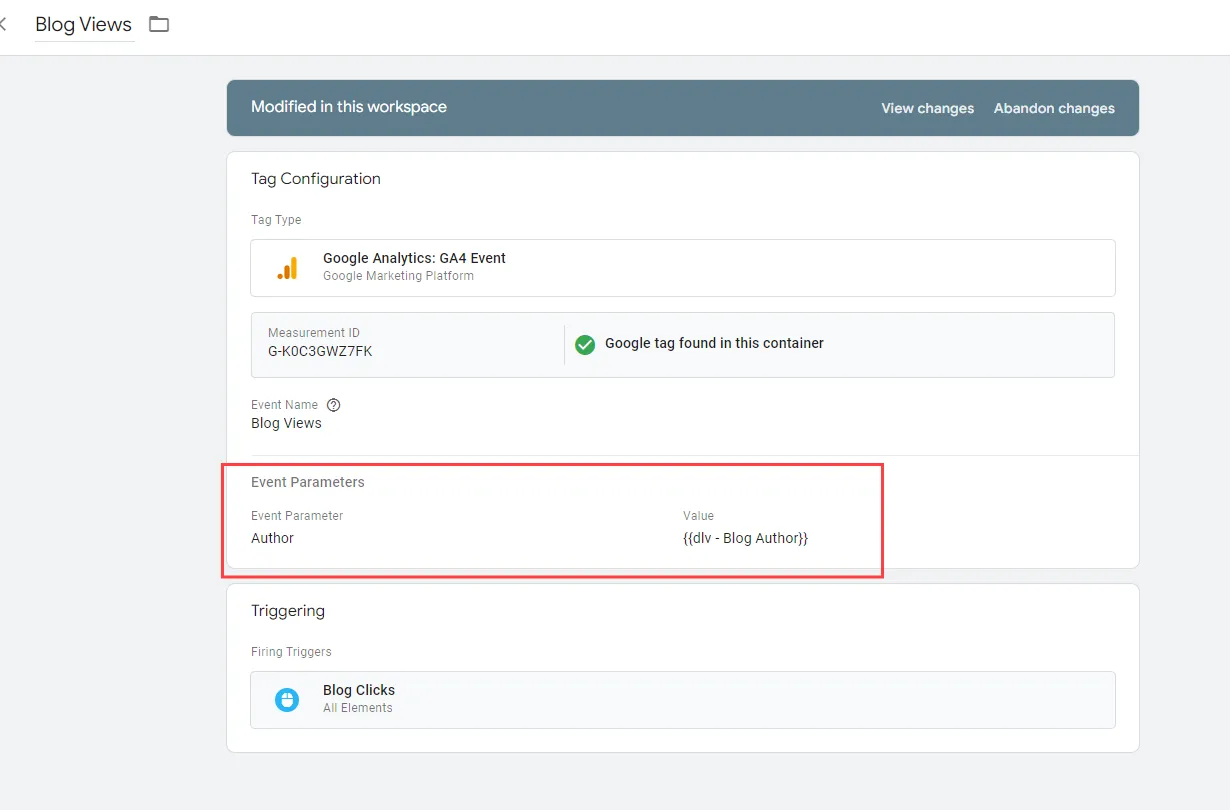
You can either make a new GA4 event tag or add this parameter to a current one in order to use it. In this example, I’m adding to our existing event tag, “Blog Views”.
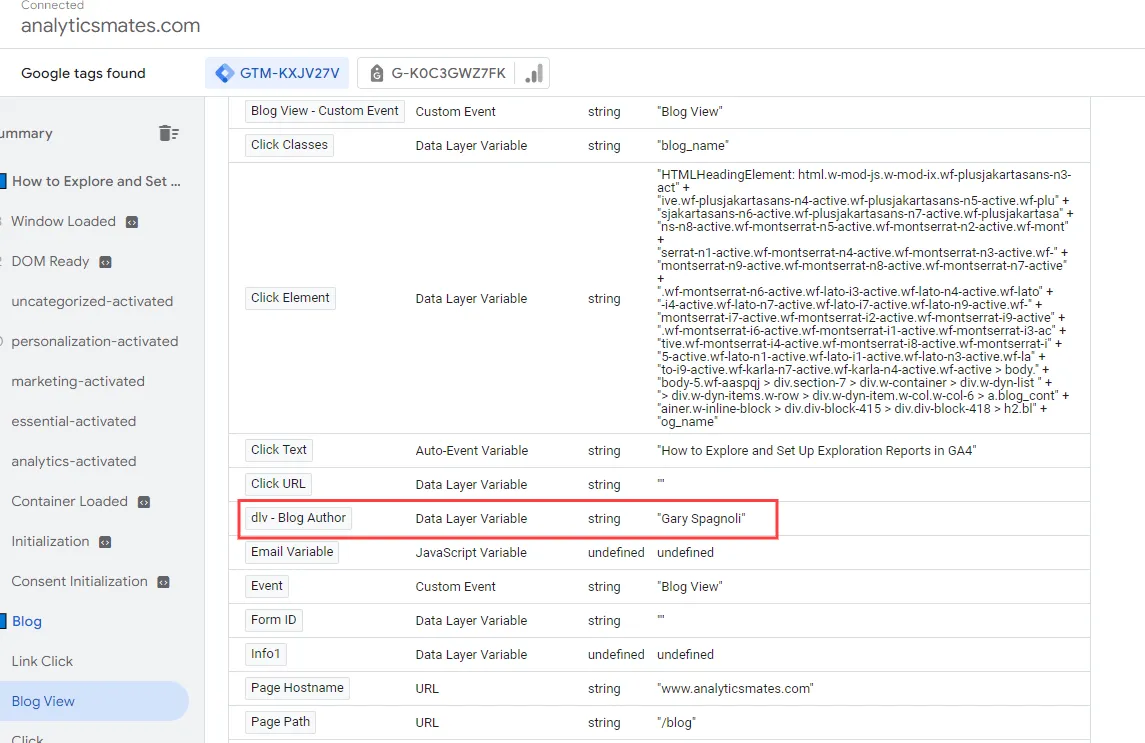
You can check it once again using Preview and debug mode in GTM.
Make sure, to that you’ll take an action that will trigger the tag. In this scenario, just clicking any blog post. And you should be able to see the new variable in the preview mode - like this:
You can also confirm that the data has been passed to GA4 by checking the DebugView section.

That's it! You can reuse the same steps to add more data parameters via the data layer and pass them to GA4, which can be used to generate more custom reports.
Common issues/Mistakes and How to Fix Them
Missing and Incorrect Data
The most common problems with the Data Layer are either mismatched data or missing data. This can be very frustrating, but it can be prevented and fixed if you follow all the best practices and implement the Data Layer correctly. Sometimes, you've checked everything and you're sure that there's nothing wrong with the setup, but the problem persists. So, we've collected some of the known Data Layer issues that you may be facing.
1) When it comes to Ecommerce tracking, it must be formatted correctly based on this documentation. Here are some few points you need to pay attention:
- Make certain that all of the values are formatted correctly. In this case, quotation marks should be used around a number that is a string, which means it is text.
- Such as:
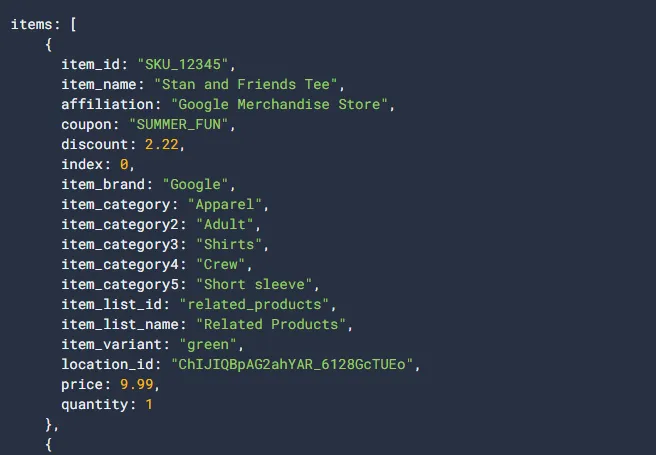
- Do what it says and fill out all the fields that are asked for. You can look at the instructions for Google Analytics and GTM to find out which values are needed and which ones are not.
- Keep in mind the dollar signs ($9.99) when adding prices, as shown in the image above. Don't use it.
- Problems can be caused by a single letter or sign. Like, item_id- SKU_12345 is not the same as item_id- SKU_12345.
2) Another common mistake is missing transactions due to redirection during check out steps.
If you are using Google Tag Manager (GTM) and Google Analytics 4 (GA4) to track transactions, you need to push purchase information to the Data Layer when the purchase is complete. If the user is sent to a Thank you page, that's where the dataLayer.push() command should be run.
Check the style and numbers of the buy data to make sure they are sent to the Data Layer when a purchase is made. If you have hardcoded tracking implemented in your website, check that this code is sending purchase data into the Data Layer. You can use tools like those mentioned in this blog post to verify this.
3) Sometimes, data layer variables are not populated when the page loads, or data layer events do not trigger the correct tags in Google Tag Manager.
This means that Google Tag Manager can't always get to the data that is saved in the Data Layer when it needs to. Several things can cause this to happen, such as:
- The data layer variables have not been declared correctly.
- The data layer variables are being populated after the page has loaded.
- The data layer events are not being fired correctly.
- In Google Tag Manager, the data layer triggers are not set up correctly.
Should you be having this problem, you can fix it by following these steps:
- Make sure that the variables in the data layer have been defined properly. You can do this by using the Google Tag Manager Preview and Debug mode.
- Check that the data layer variables are being populated before the page has loaded. You can do this by using the Google Tag Manager Preview and Debug mode to set a breakpoint on the data layer variable and then inspect the variable value.
- Check that the data layer events are being fired correctly. You can do this by using the Google Tag Manager Preview and Debug mode to set a breakpoint on the data layer event and then inspect the event data.
- Check that the data layer triggers in Google Tag Manager are configured correctly. You can do this by reviewing the trigger configuration settings.
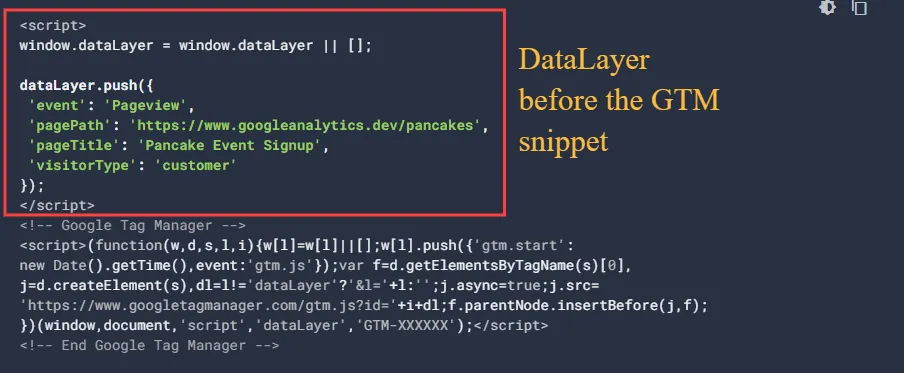
4) Placement could make a big difference.
Move the Data Layer snippet above the container snippet to ensure that variables pushed to the Data Layer can fire tags on page loads with a matching condition.
Therefore, it is important to place the Data Layer snippet above the container snippet so that tags can access the data they need to fire correctly. It should look like this:
Duplicate Data
One of the most common mistakes is data duplication, which can be caused by incorrect implementation. You can easily catch these errors by leveraging the GA4 Real-time Reporting, Event Debugging tools and Chrome Dev Tools (check more of this below).
When the same event is pushed to the Data Layer multiple times, it can cause duplicate Data Layer events, which can lead to duplicate events being sent to Google Analytics 4 (GA4). Imagine you're seeing duplicate "add_to_cart" events in your GA4 Debug View. This means that the events are being sent when a user clicks the "Add To Cart" button and a "DataLayer.push" is triggered. This makes the click information visible in preview mode.
Make sure that events aren't being sent to the Data Layer more than once on the same page to fix this. To do this, look through the code of your website for places where the same event is being pushed more than once.
Privacy Issues
The Data Layer and Google Tag Manager (GTM) raise privacy issues mostly about data collection, user permission, and following privacy laws like the General Data Protection Regulation (GDPR) and the California Consumer Privacy Act (CCPA). However, GTM assures users that it is compliant with these regulations and will continue to ensure that its practices are in accordance with the latest requirements.
We just need to be careful in making sure that we’re not adding sensitive information to the data layer such as credit card information, names and email address/es – These are all considered Personally Identifiable Information (PII). Information such as credit card numbers or passwords. Remember that anyone who views your website's source code can see this information.
Forgetting about case sensitive data
The dataLayer object name is case-sensitive: If you try to push a variable or event without the proper casing, the push will not work.
Here’s an example:
datalayer.push({'pageTitle': 'Home'}); // Bad (datalayer in lowercase)
dataLayer.push({'pageTitle': 'Home'}); // Good (dataLayer in camel case)
Tools to Debug and Verify Data Layer Push
Developer tools: Most web browsers have built-in developer tools that can be used to inspect the data layer. For example, in Chrome Dev Tools:
- Go to Windows, and hit Ctrl+Shift+I. On Mac, and hit Cmd+Opt+I to launch the developer tools.
- Then, click the Console tab
- Type dataLayer to view the data layer object.
Browser extensions: There are a number of browser extensions that can help you debug the data layer. Some popular options include:
- Tag Assistant: This extension from Google can help you identify and troubleshoot problems with your Google Tag Manager tags and triggers.
- Data Layer Checker: This add-on lets you look at the data layer without opening the developer tools.
- Data Layer Inspector: The Data Layer Inspector application gives you a full picture of the data layer, showing all the factors and their values.
Tag management systems: Tag management systems: Some tag management systems (TMS), like Google Tag Manager (GTM), have analysis tools for the data layer that are built in. In GTM, for instance, you can use the Preview and Debug modes to watch how the data layer is being filled in as you work on a page.
Best Practices
Aligned Goals with the Web Developer while Working Closely with Them
Using the Data Layer in Google Tag Manager (GTM) requires alignment of your objectives with those of the web development team. Working together and talking to web developers and marketing or analytics teams clearly can make your GTM implementation a lot more successful.

How to get computer workers to work towards the same goals:
- Communication: Getting message: Start by making sure you can talk to the web development team in an open and regular way. Clearly convey your tracking requirements and objectives.
- Collaboration: Involve web developers in the planning phase of your GTM implementation. Discuss the Data Layer structure and events before implementation begins.
- Documentation: Create clear and comprehensive documentation that outlines the Data Layer structure, variable naming conventions, and expected events. Share this documentation with the web development team.
- Testing: Test the Data Layer code with other people to make sure that the data is being gathered correctly and that it meets your needs for tracking.
- Feedback: Keep a feedback loop open with web workers at all times. It is important to let everyone know right away about any changes to the website that affect the Data Layer so that tracking stays accurate.
Using the Right Tools for Debugging
Debugging is a way to make sure that your Data Layer code is working right and that you are getting the right data. On top of that, it can help you find and fix any problems fast.

Plus, why is this method important?
- Finding Mistakes: Debugging tools help you find and target mistakes or problems in your Data Layer application. Issues with variable numbers, event prompts, or disagreements are all part of this.
- Validation: Debugging lets you check that the data you're sending to GTM through the Data Layer is correct and meets your tracking needs.
- Efficiency: Debugging tools make it easier to figure out what's wrong. You don't have to do everything by hand; these tools can help you find and fix problems quickly.
- Real-time Testing: Many debugging tools give you feedback in real time, so you can see how data moves through the Data Layer and GTM as users interact with the app.
Regular Audits of Data
Regular audits of the data you receive through your GTM usage help you keep it accurate and of good quality.

Why it's important to do regular checks and how to do them right:
- Data Accuracy: Audits make sure that the GTM data collected correctly shows how users interact with and use the website. This is very important for making smart business choices.
- Data Quality: Regular checks help keep data quality high by finding and fixing any mistakes, lost data, or problems with the way you're tracking things.
- Compliance: Data checks can help you make sure that the way you gather data is legal and in line with privacy laws like GDPR or CCPA. This is very important if you want to stay out of trouble with the law.
- Management of Tags: Sites might change and get new features over time. By doing regular checks, you can be sure that your GTM container and Data Layer are still in line with how your website is right now.
Frequently asked questions
Should dataLayer come before or after GTM?
Answer: The Data Layer piece needs to be placed above the Google Tag Manager wrapper code in the code of your page. Google Tag Manager won't be able to get the data if the piece is put after the GTM folder code.
Can I change the info that I push into the info Layer?
Answer: Yes, you can use JavaScript to automatically push data into the data layer. This lets you add new data to the data layer in real time based on how people use the website and other events.
In GTM, why is the Data Layer important?
Answer: The Data Layer is an important part of GTM because it lets you access and use organised data from your website. This makes it easier to add tracking codes and change tags without having to change the website's code directly.
What should we do next:
You've made it to this part of the page, so good job! You're great. You might still not be sure of some things, but you're on the right track. We believe you can gain more knowledge, and here are some resources to help you continue learning:
- What is Data Thresholding in Google Analytics 4 Reports?
- Understanding the discrepancies between Universal Analytics and GA4
- GA4 Fundamentals - Hidden Features to Improve Data Accuracy
Final word:
We've looked at the Data Layer and how it helps you keep track of and manage your website's data. We've also talked about common problems and mistakes and shared the best ways to make the execution go smoothly. Remember that Data Layer stores all of your website's data in one place, which makes it easy for tracking tools like Google Analytics to get to and use. It should get rid of the need to use random JavaScript events or HTML elements, making it easier to collect correct data in an organised way.
Now you know how to better use the Data Layer to keep track of and analyse data on your website. We want you to use these ideas on your website right away. We hope this helps you make better choices, track your data more accurately, and have a stronger online presence.
Please don't be afraid to get in touch if you have any more questions or need more help. We're here to help you get around the Data Layer and reach new heights with your digital projects.
Thanks for reading!
We're always looking for ways to improve our Google Analytics 4 blog content. Please share your feedback so we can make it even better.
See Article Images


