


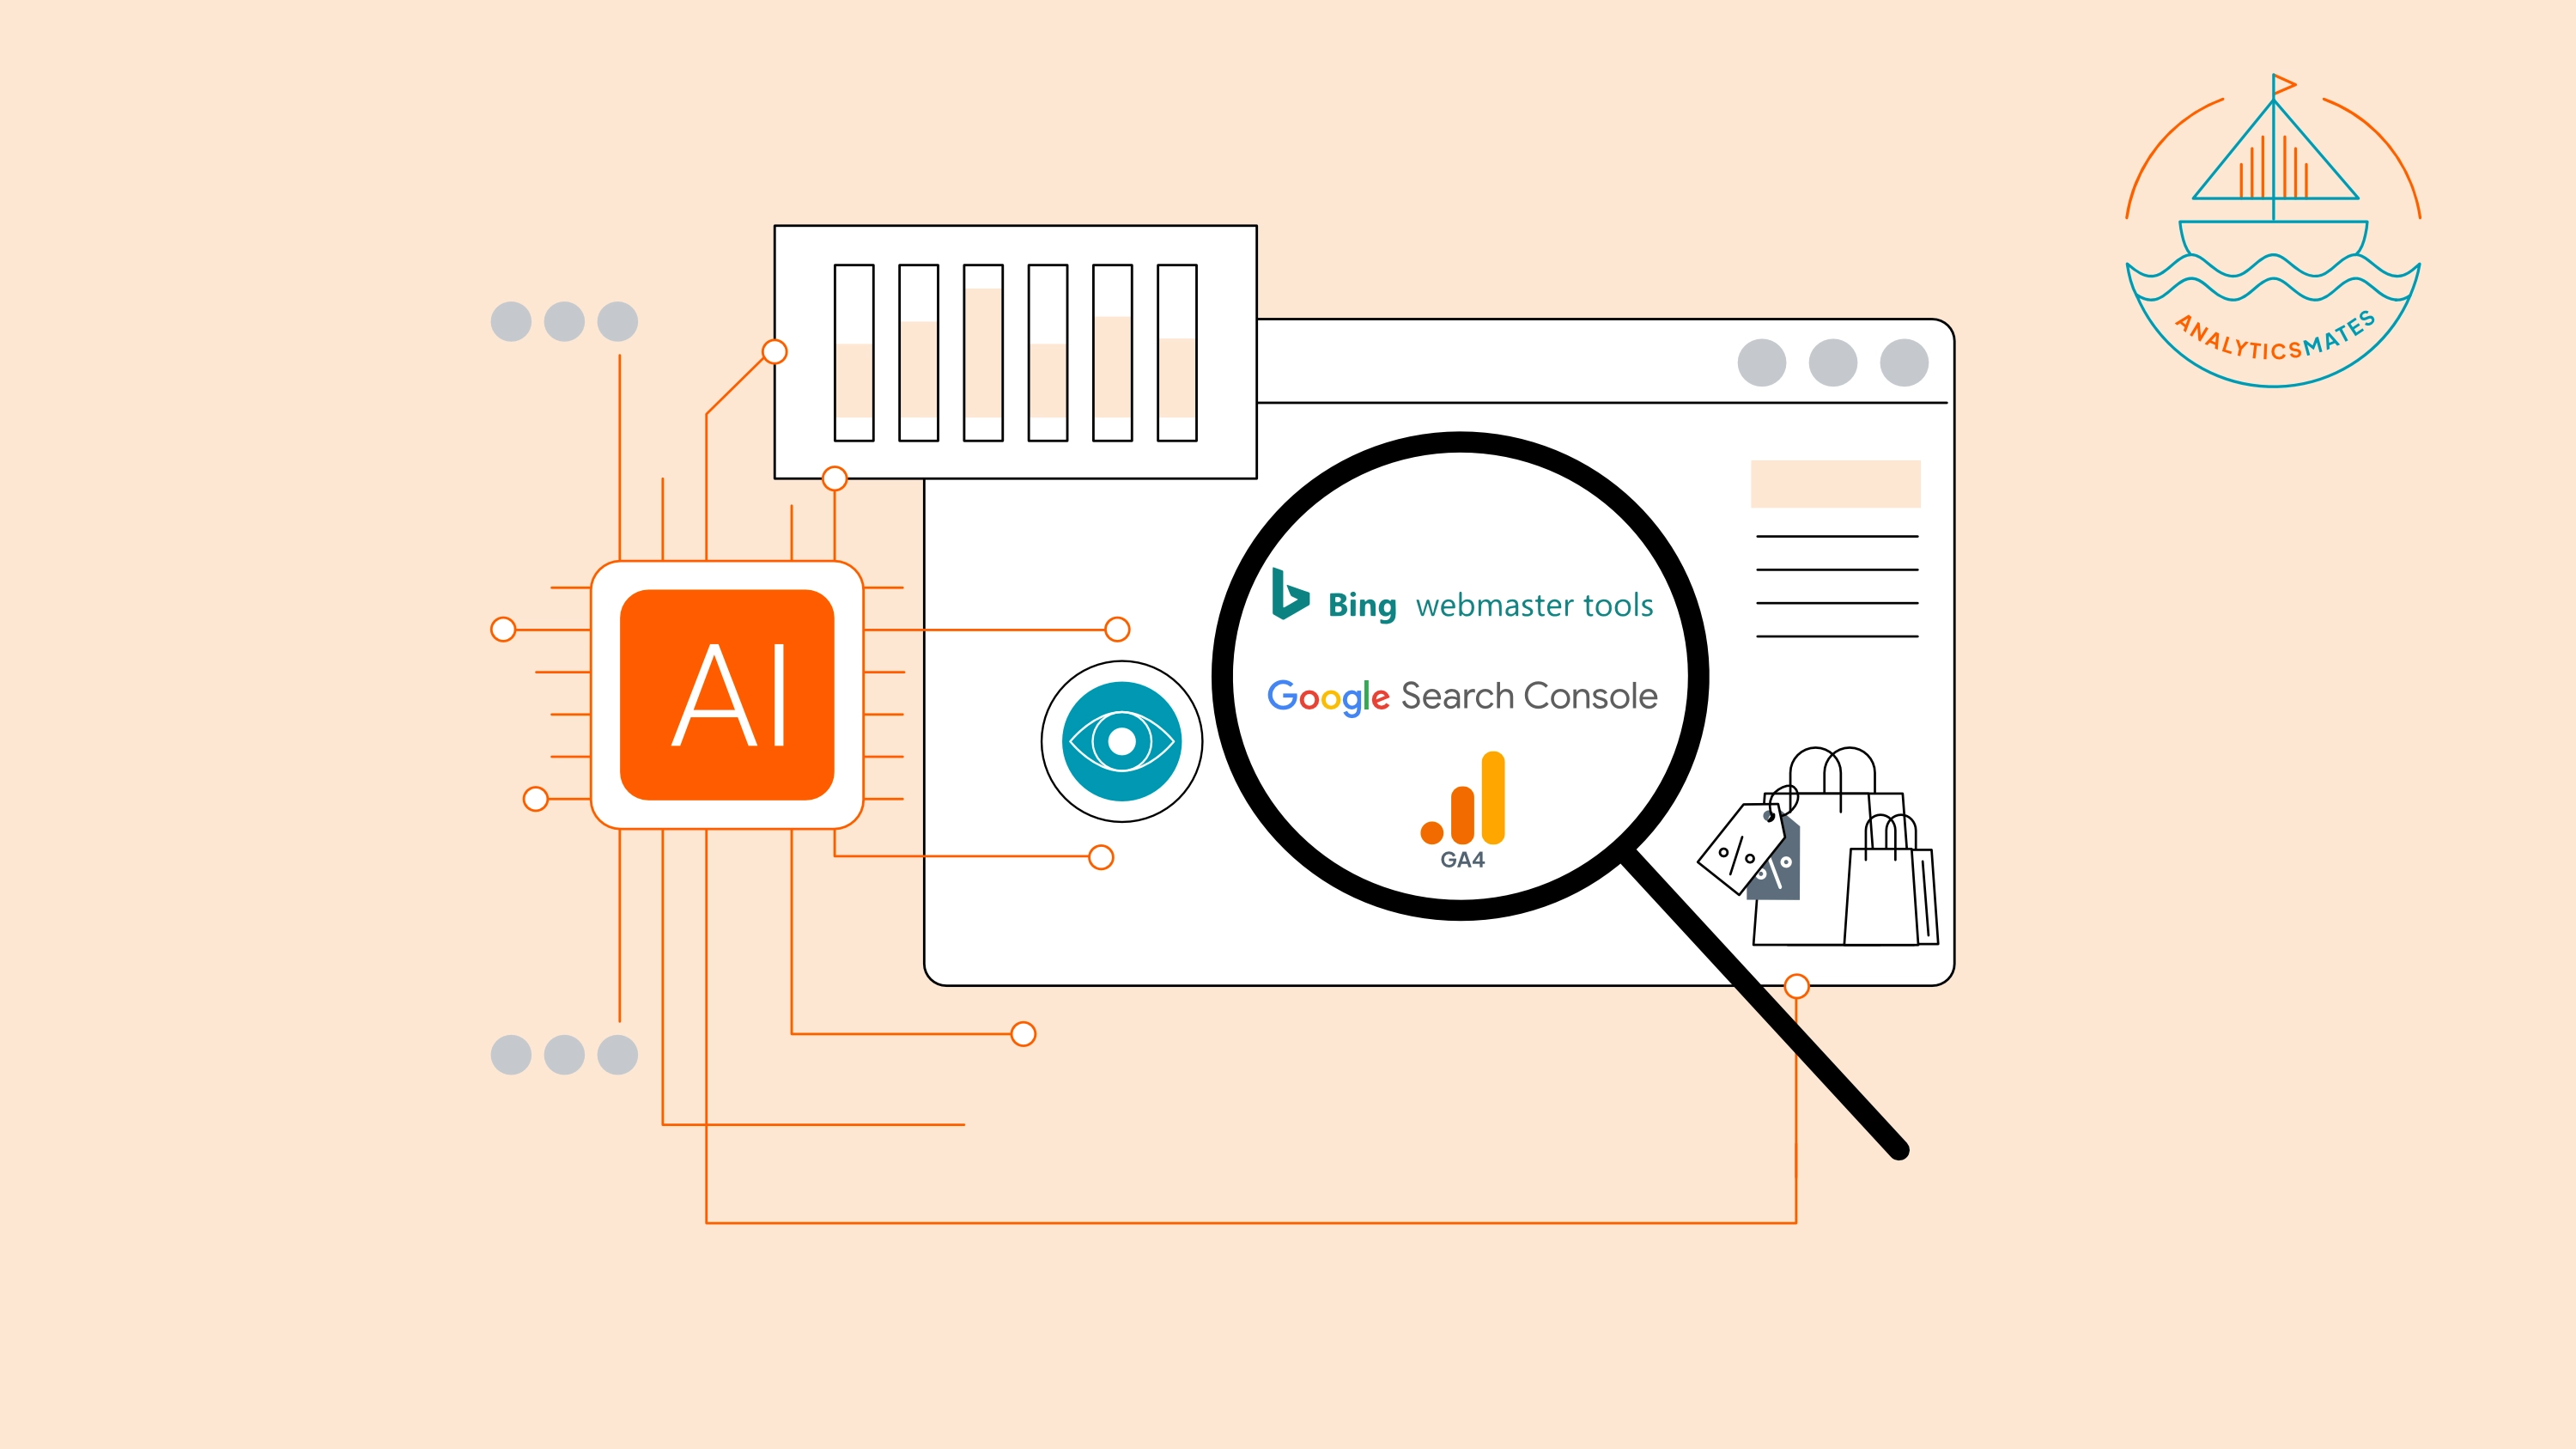
In today's digital world, where users hop between websites like a nimble ballerina, it's not enough to just track their movements on one domain. To truly understand their journey and optimize their experience, businesses need to grasp their entire digital footprint. That's where GA4 cross-domain tracking comes in.
So, in this blog post, we'll delve into the nuts and bolts of setting it up, uncover the insights it can provide, and transform your understanding of user behavior across the digital landscape.
The Problem: Tracking Multiple Domains or Platforms?
Google Analytics is a powerful tool for tracking website traffic and user behavior. However, it's important to understand how cookies work in order to interpret the data accurately. Google Analytics primarily relies on first-party cookies to track users across different platforms or websites. First-party cookies are set by the website itself and can only be read by that website. This means that if a user visits two different websites that use Google Analytics, the user will be seen as two separate visitors by Google Analytics.
This can inflate Google Analytics data and make it difficult to get a true picture of website traffic. For example, if a user clicks on a link from Website A to Website B, Google Analytics will see this as two separate visits, even though it's the same user. This can lead to overstated traffic numbers and make it difficult to track user behavior across multiple sites.
To address this, we'll implement a GA4 Cross-domain tracking. This will be discussed in more detail in the following sections...
Maybe you're wondering, how about subdomains? Well, subdomain share cookies with their root domain. This means that when User A transitions from domainA.com to test.domainA.com, Google Analytics seamlessly merges their interactions across both subdomains, providing a unified view of their user journey.
If you're still confused and want to get a clearer way to understand how it works, you can watch our video explaining this in detail:
Setting Up GA4 Cross-Domain Tracking
Alright, now that we've wrapped our heads around the issue and its remedy, it's time to put it into action. How do we set this up? Before diving straight into the configuration, we'd like to introduce you to this guidelines we've developed to assist you through the process of setting up cross-domain tracking.
- Identify the Websites and Apps to Track: Clearly define the websites and apps that fall under the scope of your Google Analytics tracking. This involves understanding the purpose of each website or app and its role within the overall customer journey.
- Map User Movement: Gain insight into how users interact with your websites and apps. While a detailed customer journey map may not be necessary, understanding the key touchpoints and transitions between different domains is essential for effective tracking.
- Define Key Metrics: Determine the critical metrics that will serve as indicators of success for your tracking efforts. For e-commerce sites, this may involve tracking transactions, while lead-focused websites might prioritize form submissions. Consider creating an overall KPI (key performance indicator) that encompasses the most important conversion actions across all tracked domains.
- Consolidate or Separate Websites: Evaluate whether to combine multiple websites into a single Google Analytics property or keep them separate. Factors to consider include the coherence of the customer journey, subdomain relationships, and the presence of complementary products or websites.
So, now that we’re confident on what to do and if we’ve identified these things to consider before moving on to the next step, let's get down to business and see how we can make this happen.
Setting Up Cross Domain Tracking in GA4 - Best Practice Method
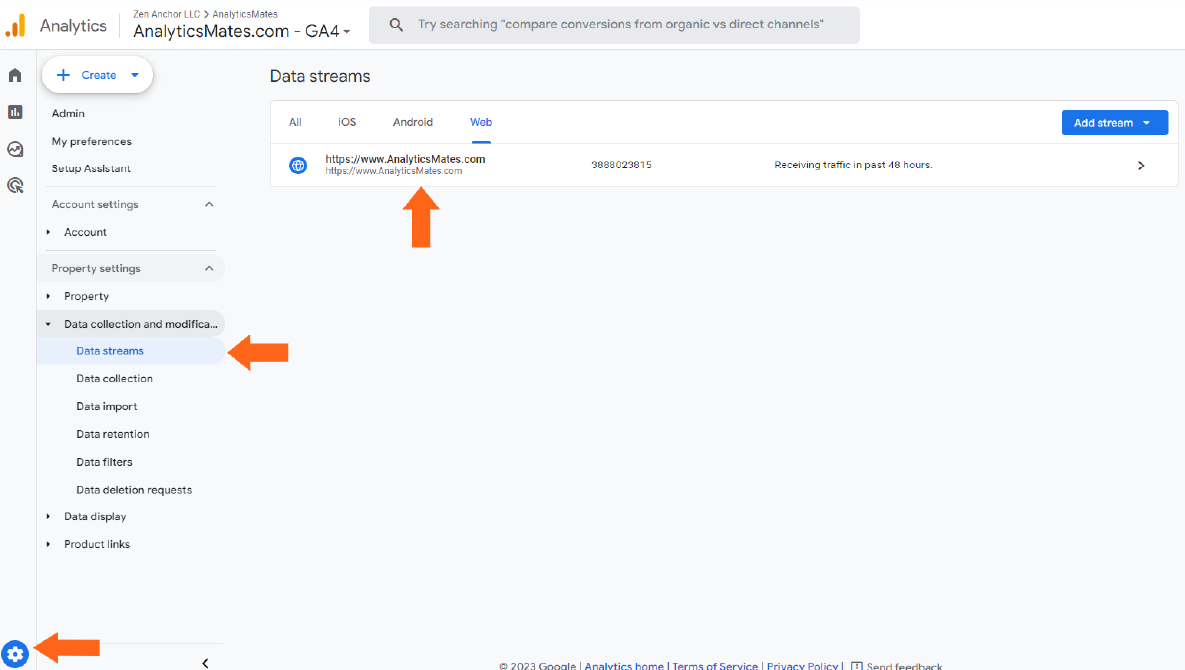
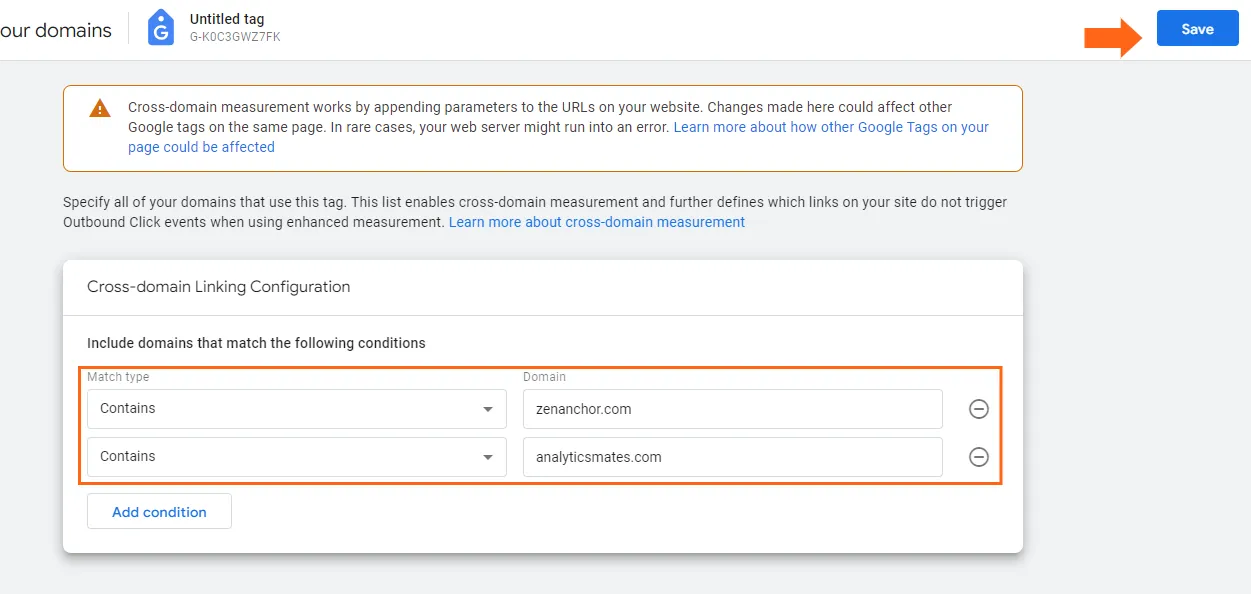
Step 1: Go to the Admin of Google Analytics > Data Streams and select web data stream
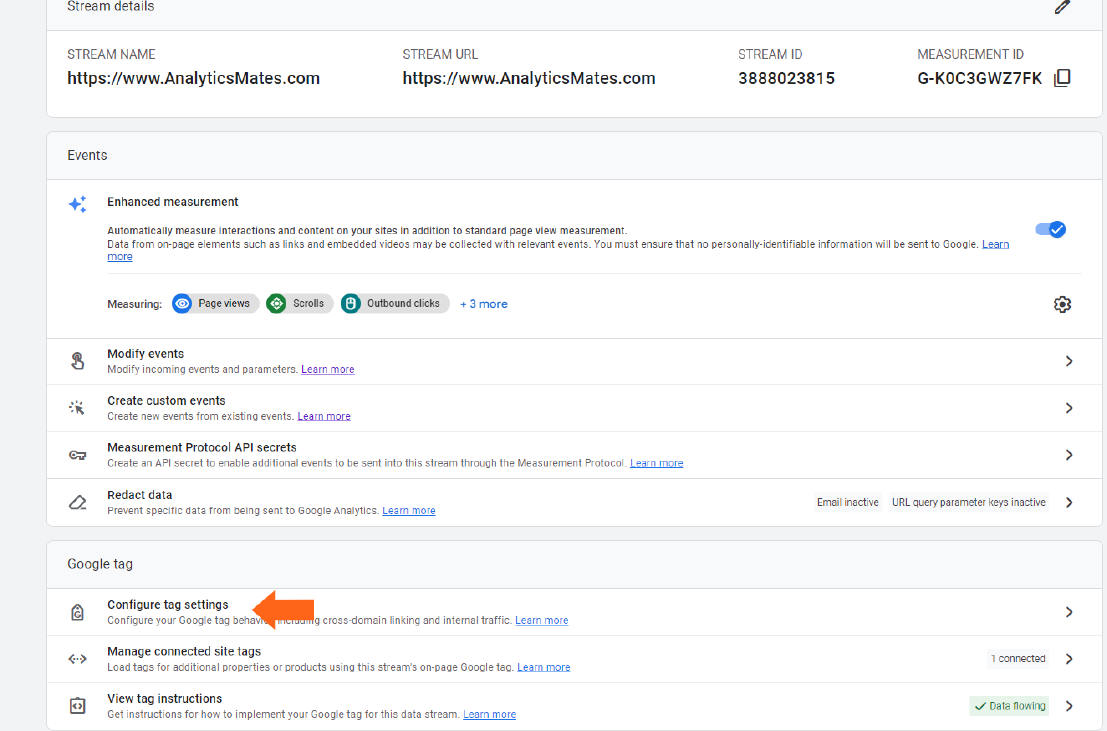
Step 2: Go to Configure Tag Settings.
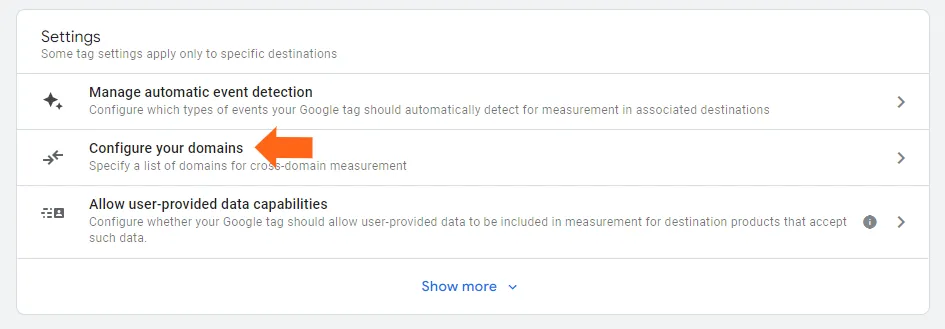
Step 3: Click Configure your domains
Step 4:Enter all domains that should be included in the cross-domain tracking setup. Then hit Save.
Setting Up Cross-Domain Tracking: Manual Approach
While configuring cross-domain measurement through the Analytics interface is the preferred method, there may be situations where you need to create a custom solution using the measurement code. In such cases, you can manually set it up using the get and set commands of the gtag.js API to maintain IDs across domains.
Here are the step-by-step process of setting up GA4 cross-domain tracking manually. We'll break down the technical aspects and provide clear instructions on what to do. Come on let’s dive right into it - here are the steps:
The manual setup is done by using the get and set commands of the gtag.js API to store IDs across domains. If you want to learn more, you can check out this documentation.
Step 1: Retrieving the client ID on the source domain, here, you can use the get method:
gtag('get', 'TAG_ID', 'client_id', (client_id) => {
// Store the client ID in a variable.
});
gtag('get', 'TAG_ID', 'session_id', (session_id) => {
// Store the session ID in a variable.
});
Step 2: Adding the client and session IDs to the link that points to the destination domain.
<a href="https://example.com/?clientId=XXXXX&sessionId=YYYYY">example.com</a>
Step 3: Read the IDs from the URL and set them with the config command:
gtag('config','TAG_ID', {
'client_id': getClientIdFromUrl(),
'session_id': getSessionIdFromUrl()
});
Once you've completed the steps above, be sure to test your setup to ensure that cross-domain tracking is working properly. To do this, check the URL of the destination domain to make sure the _gl parameter is present.
Let’s check if it’s working
Look for the GL parameter
- Visit your first website (zenanchor.com) > Click a link on that website that takes you to your second website (analyticsmates.com).
- When you arrive at analyticsmates.com, look at the URL in your browser's address bar. You should see a parameter called _gl, followed by a long string of characters.

Using the Google Analytics native DebugView
- Install the Google Analytics Debugger chrome
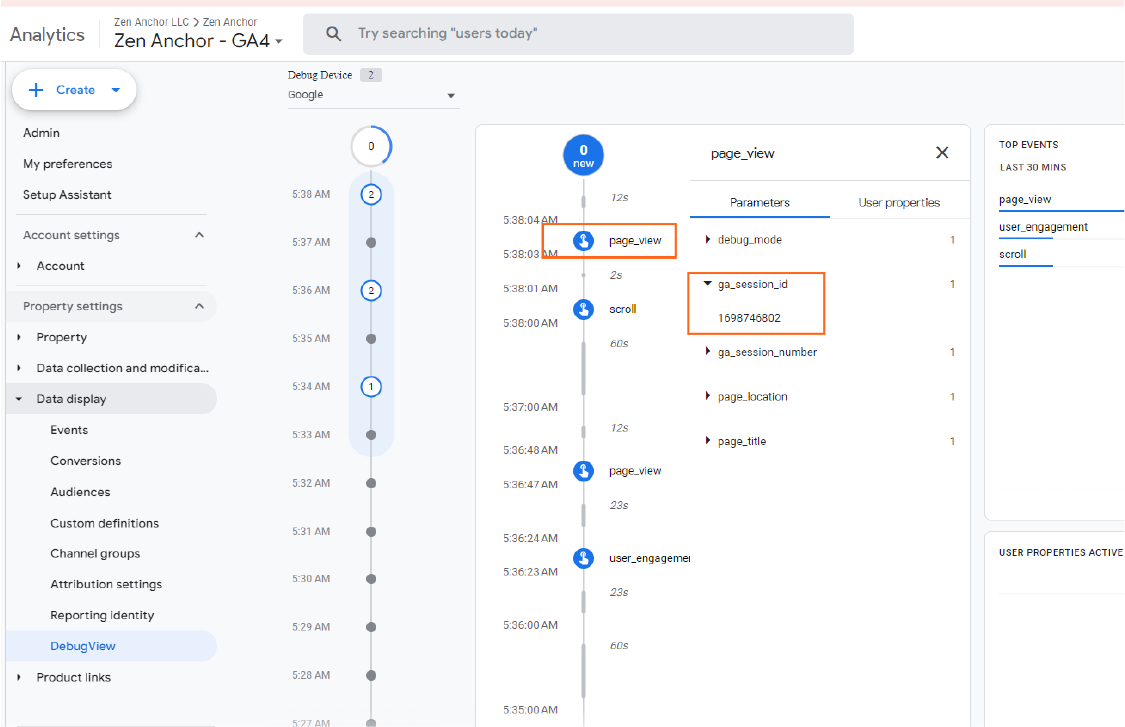
- Once installed, go “Admin” and click the “DebugView”

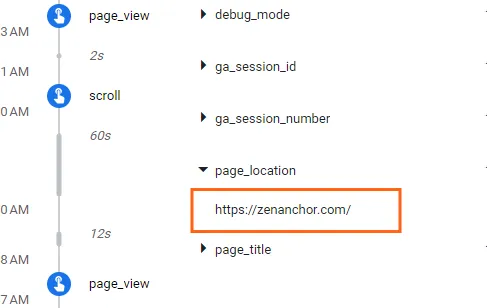
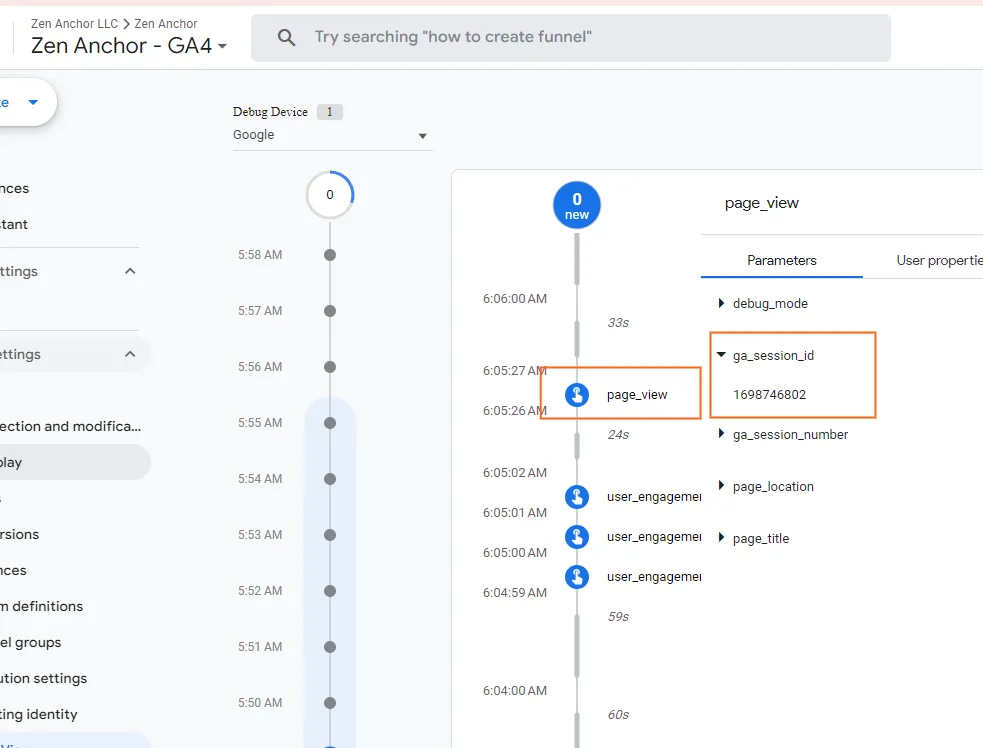
- Click the page_view event and you’ll get some more information > look at the event parameters, specifically ga_session_ID and the page_location.
In the example image, the ID is 1698746802 and the page_location is https://zenanchor.com/
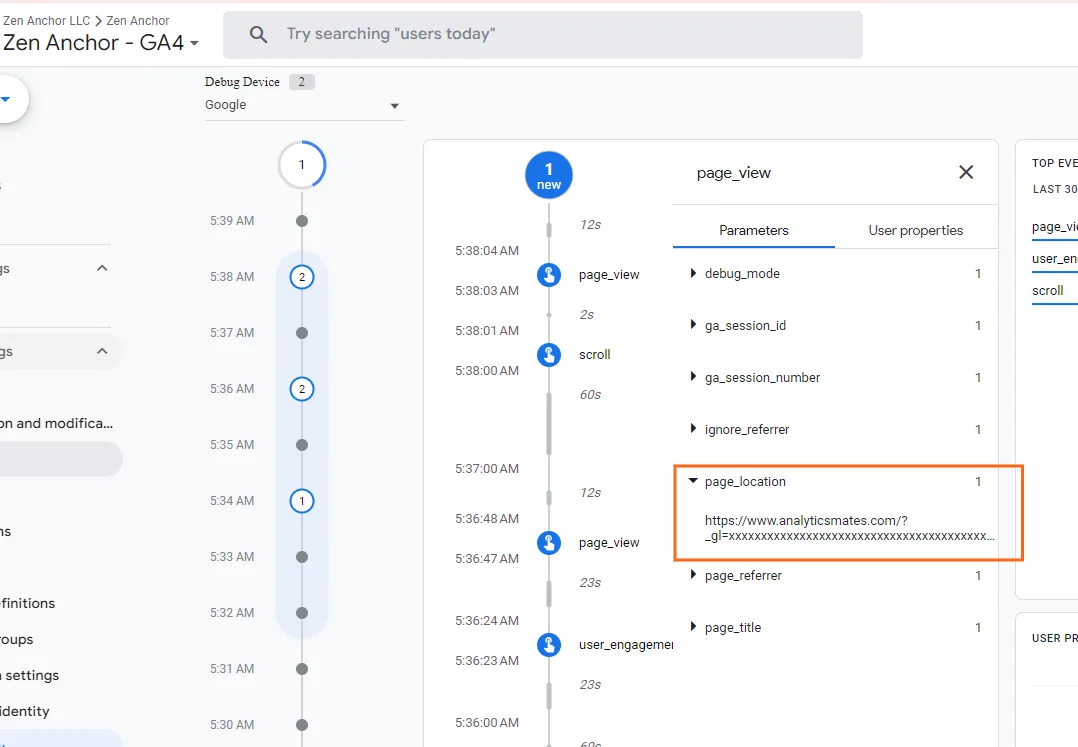
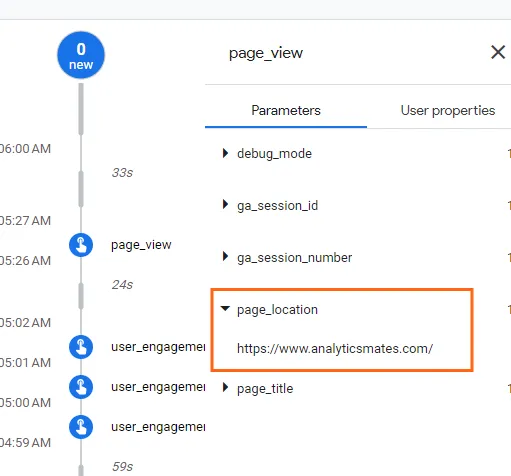
- On your first website, click the link that redirects you to your second website (analyticsmates.com). A new page view should appear in the debug view, and the ga_session_id should remain the same (1698746802).

- Clicking the page_location parameter should reveal analyticsmates.com appended with the _gl parameter: https://www.analyticsmates.com/?_gl=xxxxxxxxxxxxxxxxxxxxxxxxxxxxxxxxxxxxxxxxxx…
- If you start your session on domain B (analyticsmates.com), you will see the same ga_session_id (1698746802), but the page_location parameter will not have the _gl parameter.
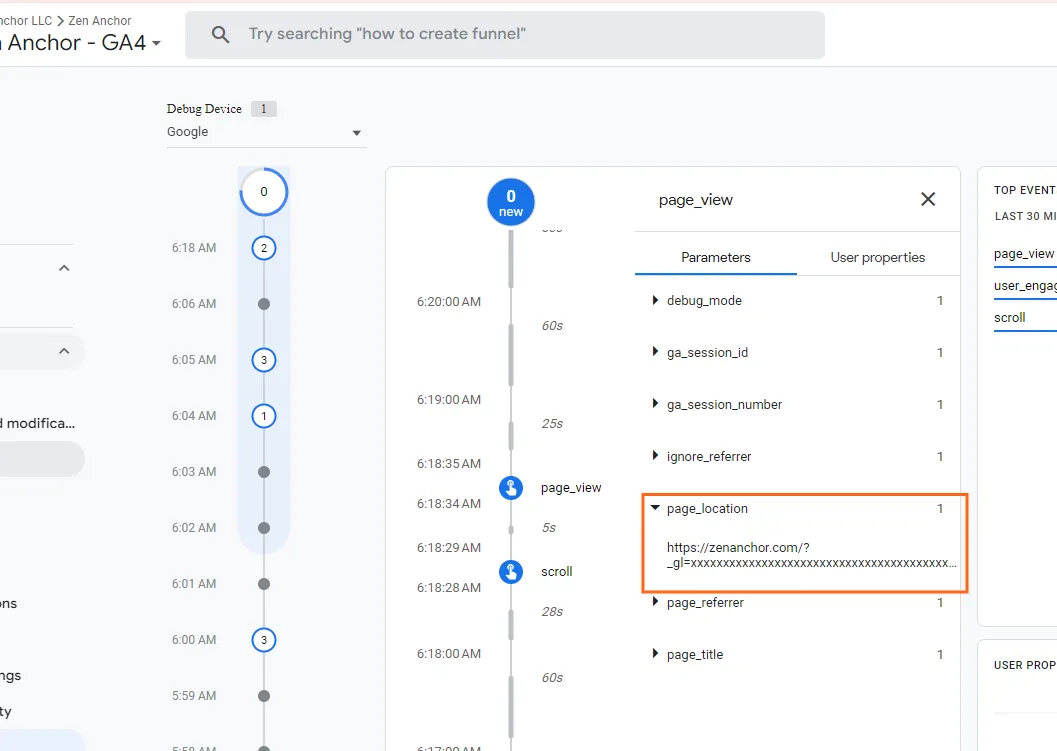
- Click the link to go to the domainB (zenanchor.com) and you should be able to see a new page_view event in debugview. The ga_session_id should be the same (1698746802)

- Clicking the page_location parameter will reveal zenanchor.com with the _gl parameter appended to it: https://zenanchor.com/?_gl=xxxxxxxxxxxxxxxxxxxxxxxxxxxxxxxxxxxxxxxxxx…
Troubleshooting Common Issues with Cross-domain Tracking
I bet you did great in setting up and testing your cross-domain tracking. You should be good to go. But sometimes, even if you’ve configured it correctly, there will always be some technical issues. Here are some that you should be aware of.
Issue: URL redirects and inconsistent URL structures can cause tracking issues.
Solution: Ensure that the parameter _gl is not dropped in the destination domain
- URL redirects and inconsistencies in URL structures can disrupt tracking accuracy. To address this, ensure that the _gl parameter is consistently included in the destination domain.
Issue: Users may have privacy settings that prevent tracking, which can make cross-domain tracking less accurate.
Solution: Be aware of this and consider using other methods, like server-side tracking, to improve accuracy.
- User privacy settings can hinder cross-domain tracking accuracy. To address this, be mindful of these limitations and consider implementing complementary methods, such as server-side tracking, to enhance data reliability.
Issue: Some browser extensions and ad blockers can block tracking codes
Solution: Unfortunately, there is often no easy solution to this type of issue, as we cannot force users to disable their browser extensions and ad blockers when they visit our websites.
Issue: Other scripts on the page can interfere with your code, preventing your events from being processed.
Solution: Get the help of your experienced web developer to ensure that it can move and reach the event listener.
In addition to this text, we've also prepared a video that walks you through these steps.
Customizing GA4 Reports for Cross-domain Analysis
We can't finish this blog post without sharing with you how to manage the data in Google Analytics 4 reporting. Here are the steps you might want to consider.
Standard Reports
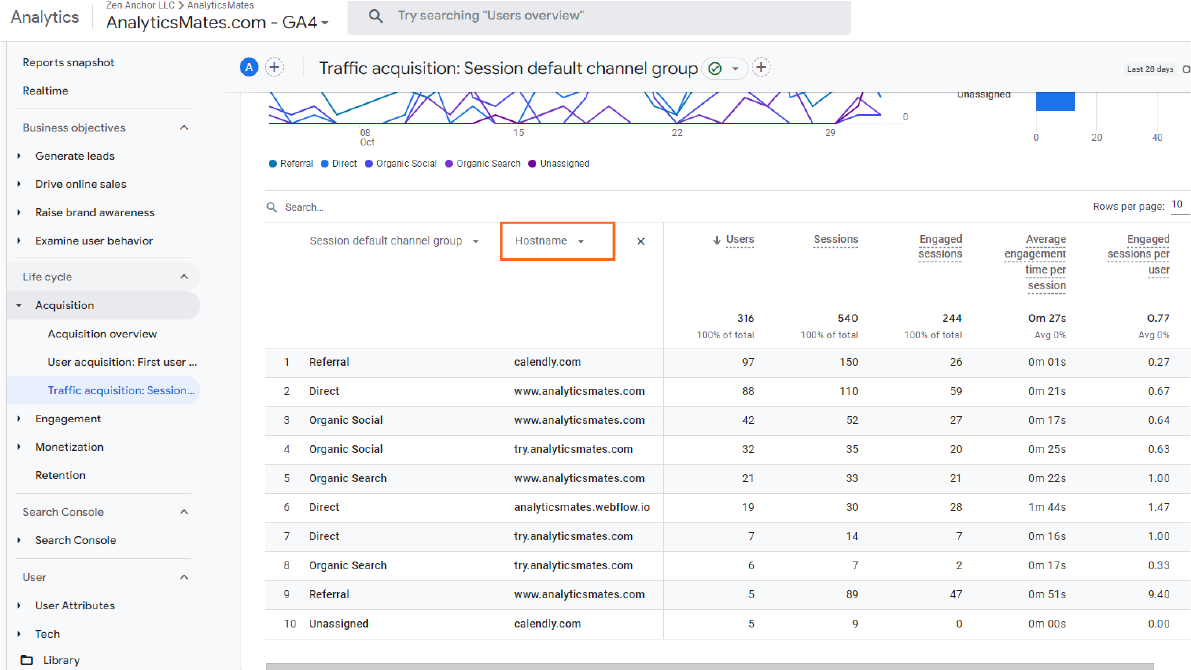
- Go to the GA4 reporting interface.
- Go to the report that you want to view.
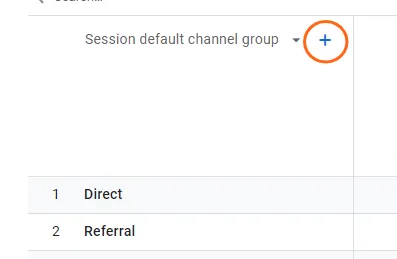
- Click the “+” icon and add the hostname dimension to the report.
- Click the Apply button.
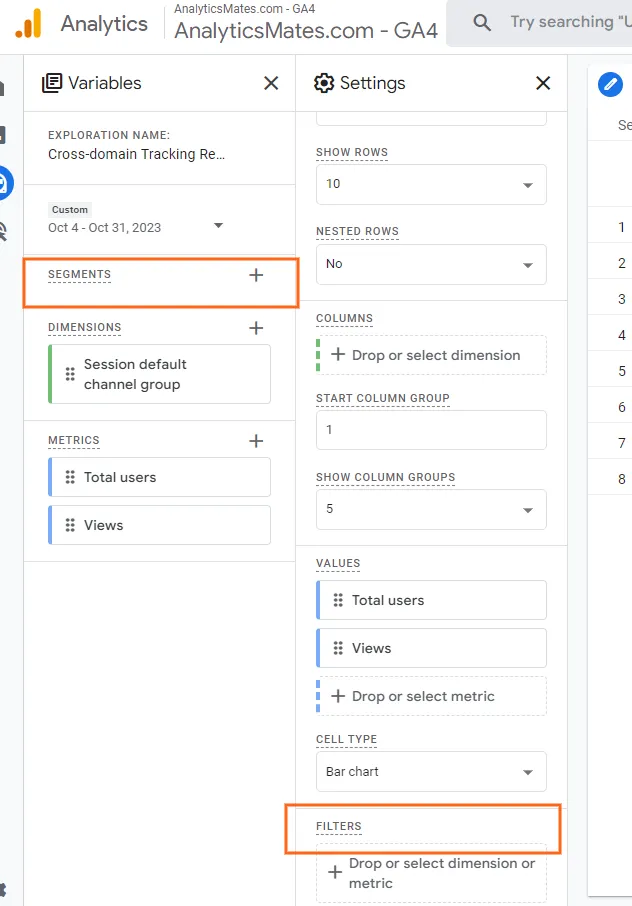
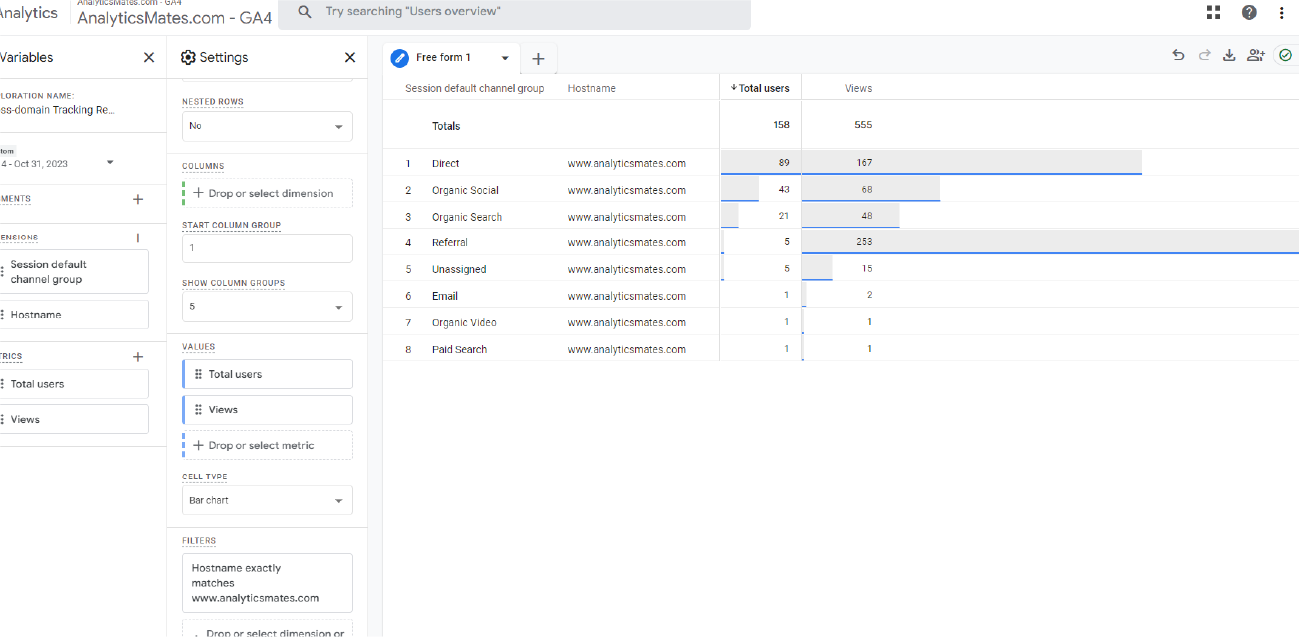
Custom Reports using Exploration Report
- Go to Explore report > click Blank form report
- Include all the relevant dimensions and metrics for your analysis.
- Drop them in the report

Two ways to achieve this:
- Using SEGMENTS
- Using FILTERS
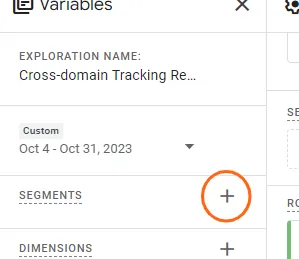
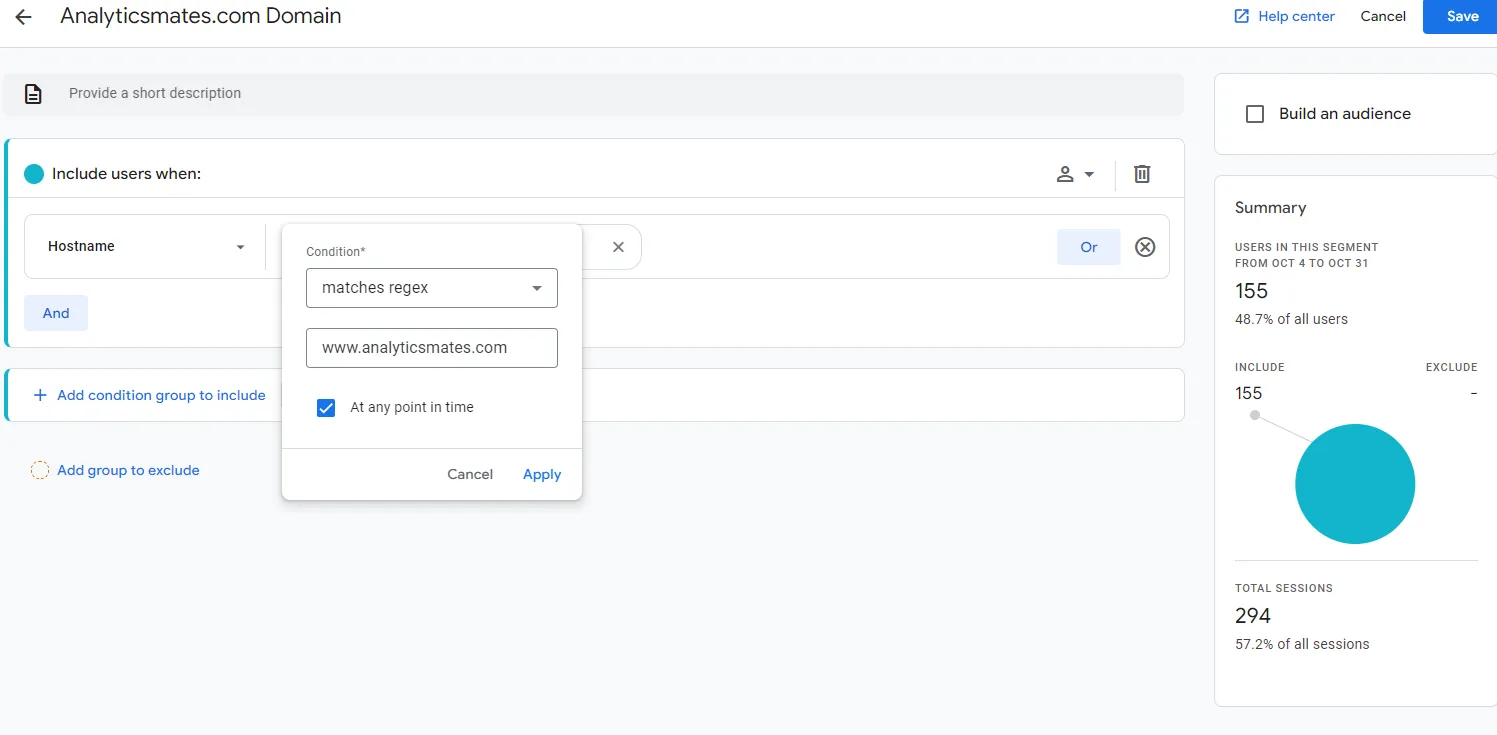
Using SEGMENTS
- Click the “+”
- To configure the segment for a specific domain, add the hostname to the segment definition
- Click “Save”
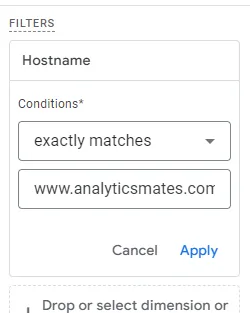
Using FILTERS
- Filter the report by the hostname dimension.
- Set the filter condition to only include the hostname of the website you want to see in the report (example: www.analyticsmates.com)
- Click “Apply”

You should be able to see a report generated similar to this:
Recommendations and Tips
Before we conclude we’d like to share with you these best practices which should help you stay on top of your cross-domain tracking.
Maintain a Detailed Documentation of Your Setup
Thorough documentation is your key to staying informed and organized when managing your cross-domain tracking implementation. It serves as a roadmap, allowing you to easily identify and troubleshoot any issues that may arise. By documenting the specific configurations, parameters, and integrations involved, you can readily understand the structure of your cross-domain tracking setup and make informed decisions for future modifications or optimizations.
Continuously Monitor and Analyze Data
Regularly reviewing and analyzing the data collected through cross-domain tracking provides invaluable insights into user behavior and the effectiveness of your marketing campaigns. Pay close attention to metrics such as website traffic, conversion rates, and user engagement across different domains. These insights can help you identify areas for improvement, optimize your tracking strategies, and make informed decisions to enhance your overall cross-domain tracking performance.
Adhere to Data Privacy Regulations
Data privacy regulations are becoming increasingly stringent worldwide, and it's crucial to ensure that your cross-domain tracking practices comply with these evolving requirements. Familiarize yourself with the applicable regulations in the regions you operate in, such as the General Data Protection Regulation (GDPR) in the European Union and the California Consumer Privacy Act (CCPA) in the United States. Implement appropriate data governance measures, such as obtaining user consent and providing transparent privacy policies, to maintain compliance and protect user privacy.
Schedule Regular Audits of Your Cross-Domain Setup
Regularly auditing your cross-domain tracking setup is essential for maintaining its accuracy and effectiveness. This involves checking for any configuration errors, verifying that data is being collected and processed correctly, and ensuring that your tracking tools are integrated seamlessly with other marketing platforms. Regular audits help you identify and address any potential issues promptly, minimizing disruptions to your data collection and preventing data loss.
By following these recommendations, you can stay ahead of the curve in cross-domain tracking, ensuring that you collect accurate, reliable data that drives informed decisions and enhances your overall marketing efforts.
Also, we offer a video that walks you through these steps. You can watch it here.
Frequently Asked Questions
Q:Do I need to configure the referral exclusion list for cross-domain tracking in GA4?
No, GA4 handles self-referrals automatically based on the domains that you entered in the "Configure your domains" section. A referral exclusion list is needed for things like payment gateway domains, etc.
How can I ensure that my cross-domain tracking is compliant with data privacy regulations?
There are a few things you can do to ensure that your cross-domain tracking is compliant with data privacy regulations:
- Obtain user consent: You must obtain user consent before tracking them across multiple domains.
- Provide a privacy policy: You must provide a privacy policy that explains how you collect and use user data.
- Delete user data: You must delete user data upon request.
- Follow local data privacy laws: You must comply with all applicable data privacy laws in the jurisdictions where you operate.
Final Words
As we've explored, GA4 cross-domain tracking empowers businesses to transcend the confines of individual websites and paint a holistic picture of their users' digital odyssey. By stitching together disparate data points across domains, you gain a deeper understanding of user preferences, engagement patterns, and conversion pathways. This newfound knowledge empowers you to make data-driven decisions that optimize user experience, enhance marketing campaigns, and ultimately drive business growth.
With GA4 cross-domain tracking, you're no longer confined to a fragmented view of your users' interactions. Instead, you're equipped with a comprehensive understanding of their journey across the digital landscape, enabling you to anticipate their needs, personalize their experiences, and ultimately, foster enduring customer loyalty.
Thank you for reading!
We're always looking for ways to improve our Google Analytics 4 blog content. Please share your feedback so we can make it even better.
See Article Images


